|
The Van Gogh Exhibit at the MFA |
|
The Houston Museum of Fine Arts |
|
Return to the Index Page for our Trip to Houston |
We came to Houston to see the Van Gogh exhibit, but there was a second highlight of our trip- our tour of the Johnson Space Center down in Clear Lake south of Houston.
About the Johnson Space Center
The Lyndon B. Johnson Space Center (JSC) is NASA's center for human spaceflight (originally named the Manned Spacecraft Center), where human spaceflight training, research, and flight control are conducted. The first buildings were constructed beginning in 1963, and the complex acquired its current name in 1973.
|
The original Manned Spacecraft Center grew out of the Space Task Group (STG) that was formed to coordinate the US crewed spaceflight program. The STG was originally based at the Langley Research Center in Hampton, Virginia, but the program grew so rapidly that this site became insufficient. Planning began in 1961 to expand the STG staff into its own organization, and move it to a new facility. After a lengthy selection process, during which 25 sites across the country were evaluated, construction began at the selected site southeast of Houston on land originally donated by the Humble Oil company to Rice University, with the first buildings opening in 1963. (Today, the JSC is one of ten major NASA field centers.)
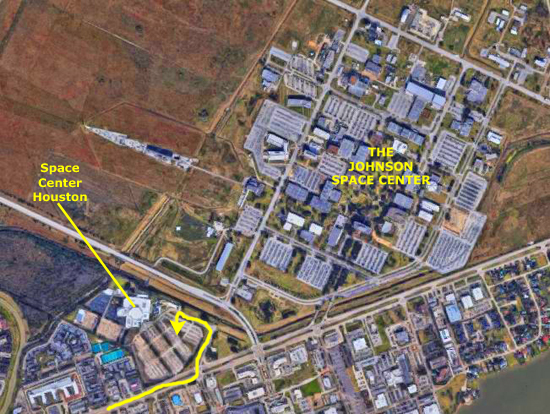
I'll have more to say about the individual buildings at the JSC in conjunction with the tram tour that we took during our visit. All visits to the JSC today begin at "Space Center Houston", a large visitor center, museum, and tourist facility just off the main JSC campus, and we will start our own visit there.
Getting to Space Center Houston and the JSC
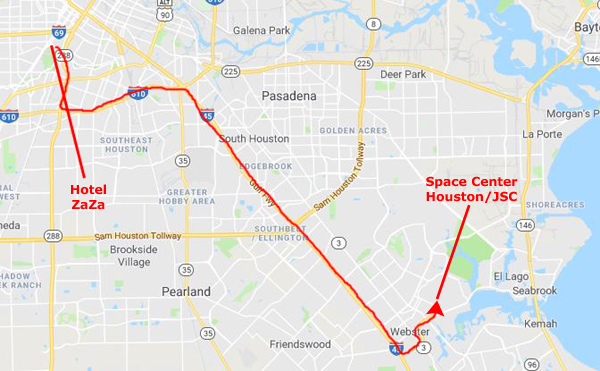
We allocated an entire day to visit the Johnson Space Center, although Guy and Prudence elected to stay behind at the ZaZa hotel so Prudence could take care of Jax and Guy (whose interest in the tour was low, could also take some time to work on some of his upcoming services).
|
We took that around to the east to pick up Interstate 45 south. Twenty miles down that highway we turned off at the marked exit for the Space Center, which took us eventually to NASA Parkway. Space Center Houston is a major area attraction, like Disney World or something similar, so it was hard to miss the turn into the complex and the parking area for Space Center Houston, the relatively new visitor complex for the JSC.
Before we look at the pictures from our JSC Tram Tour and those we took in the Visitor Center and Museum, let me take a moment to orient you to the entire Space Center Houston/JSC complex.
|
Other than the typical x-ray screening of bags and stuff, the security at the public entrance to the JSC is minimal, even when actual space missions are ongoing, as they usually are today given the continued habitation on the International Space Station (ISS), habitation which is still monitored from one of the buildings in the JSC (which was on our tour).
|
We got to Space Center Houston ("SCH" from now on, to refer to the Visitor Center/Museum) fairly early; there were probably 100 cars in the parking lot when we got there (and maybe 300 when we left in the afternoon). This being a weekday and not in the summer, it was certainly not crowded (as the pictures from the Tram Tour waiting area will show). That was good, and made picture-taking a lot easier.
|
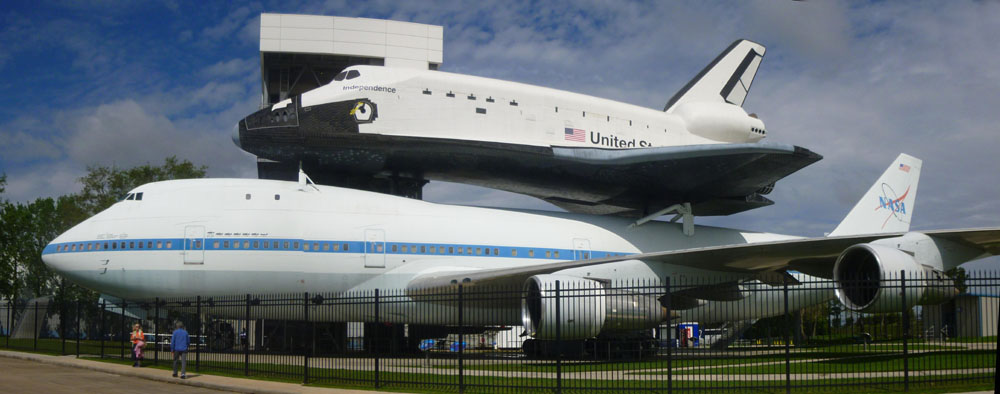
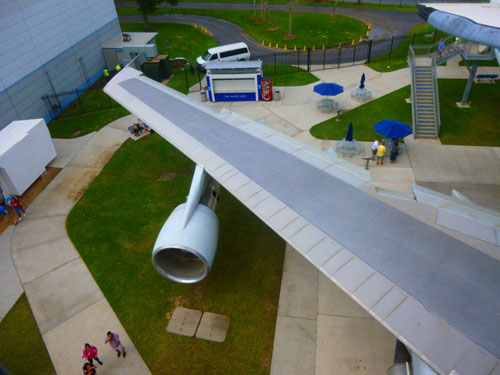
As you may already know, the Space Shuttle can't actually fly under its own power in earth's atmosphere; it has to be carried into space on a rocket and when it returns to earth it is essentially on a long glide to its landing. It can maneuver a bit as it comes in for a landing, but that's about it. Getting it back to its takeoff point thus required transport, and, highways and bridges being what they are, the size of the shuttle vehicle being what it is, transporting it on land would be impossible. So the 747 transport was the solution. After our Tram Tour, we would have an opportunity to go inside both the 747 and the Space Shuttle, and I was looking forward to that.
In case you haven't seen either a shuttle launch or landing, I thought I might include a short movie of each one here. First, you can use the movie player below, left to watch a shuttle launch, an excerpt from an IMAX movie about the Hubble Space Telescope.
|
(Mouseover Image Above for Video Controls) |
|
(Mouseover Image Above for Video Controls) |
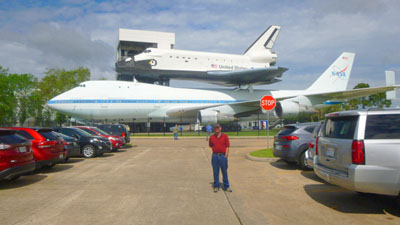
Actually, being this close to an actual 747 and an actual space shuttle was pretty amazing, or at least I thought so. Even though we would get inside later on, just standing out here looking up at them was remarkable, and we took lots of pictures. Here are just a few of them:
|
|
|
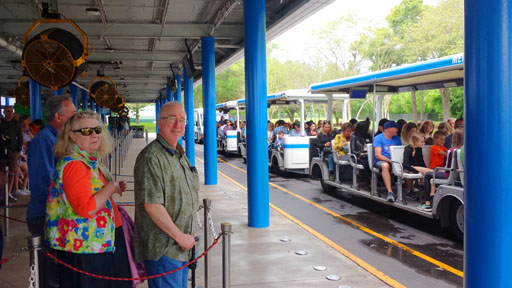
Karl had bought our tickets ahead of time online, so all we had to do was to pick them up at the entry to SCH. We went inside, and, after getting some advice from the person at the ticket window, made a beeline for the doors to the Tram Tour. The advice we'd gotten was to do the Tram Tour early, as the lines tended to get longer throughout the day, and we were happy to do that and save the museum and exhibits for later. Outside, the waiting area looked like what you might see at a theme park, and all the ropes set up certainly confirmed that at times the wait might be quite long.
When we got into the line, one tour was just about to load, and it looked like we might make it onto that tour with no wait at all. We almost did; but when we got to the front of the line for loading, there just weren't five spaces together, so we let a few couples go ahead of us and waited 25 minutes for the next tour.
|
(Mouseover Image Above for Video Controls) |
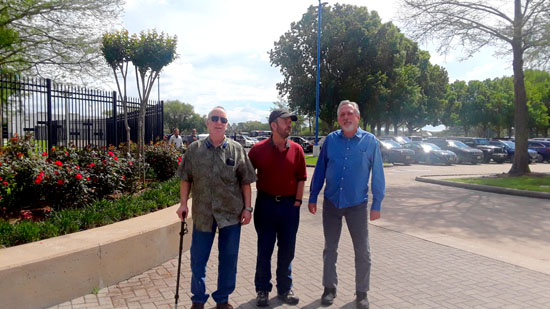
Presently, another empty tram rolled up and we began to board. Because we waited, we were able to get all together in a single row, and I took a moment to hop off and get a picture of our group. When everyone who was waiting got on, there were a few announcements and we pulled away from the tram station.
On the Tram Tour of the Johnson Space Center
The entire tram tour took more than two hours, and involved stops at three or four different buildings, and a final stop at a display building containing an entire Saturn V rocket (along with some other large pieces of rocketry gear). Probably the best way to deal with all our pictures from the tram tour is to go stop by stop.
|
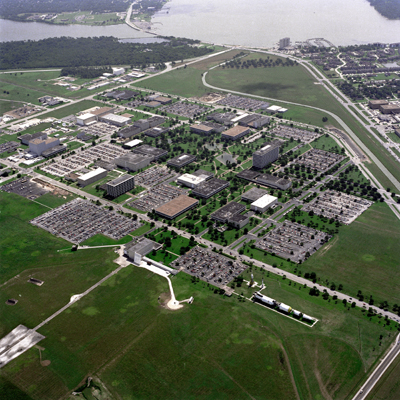
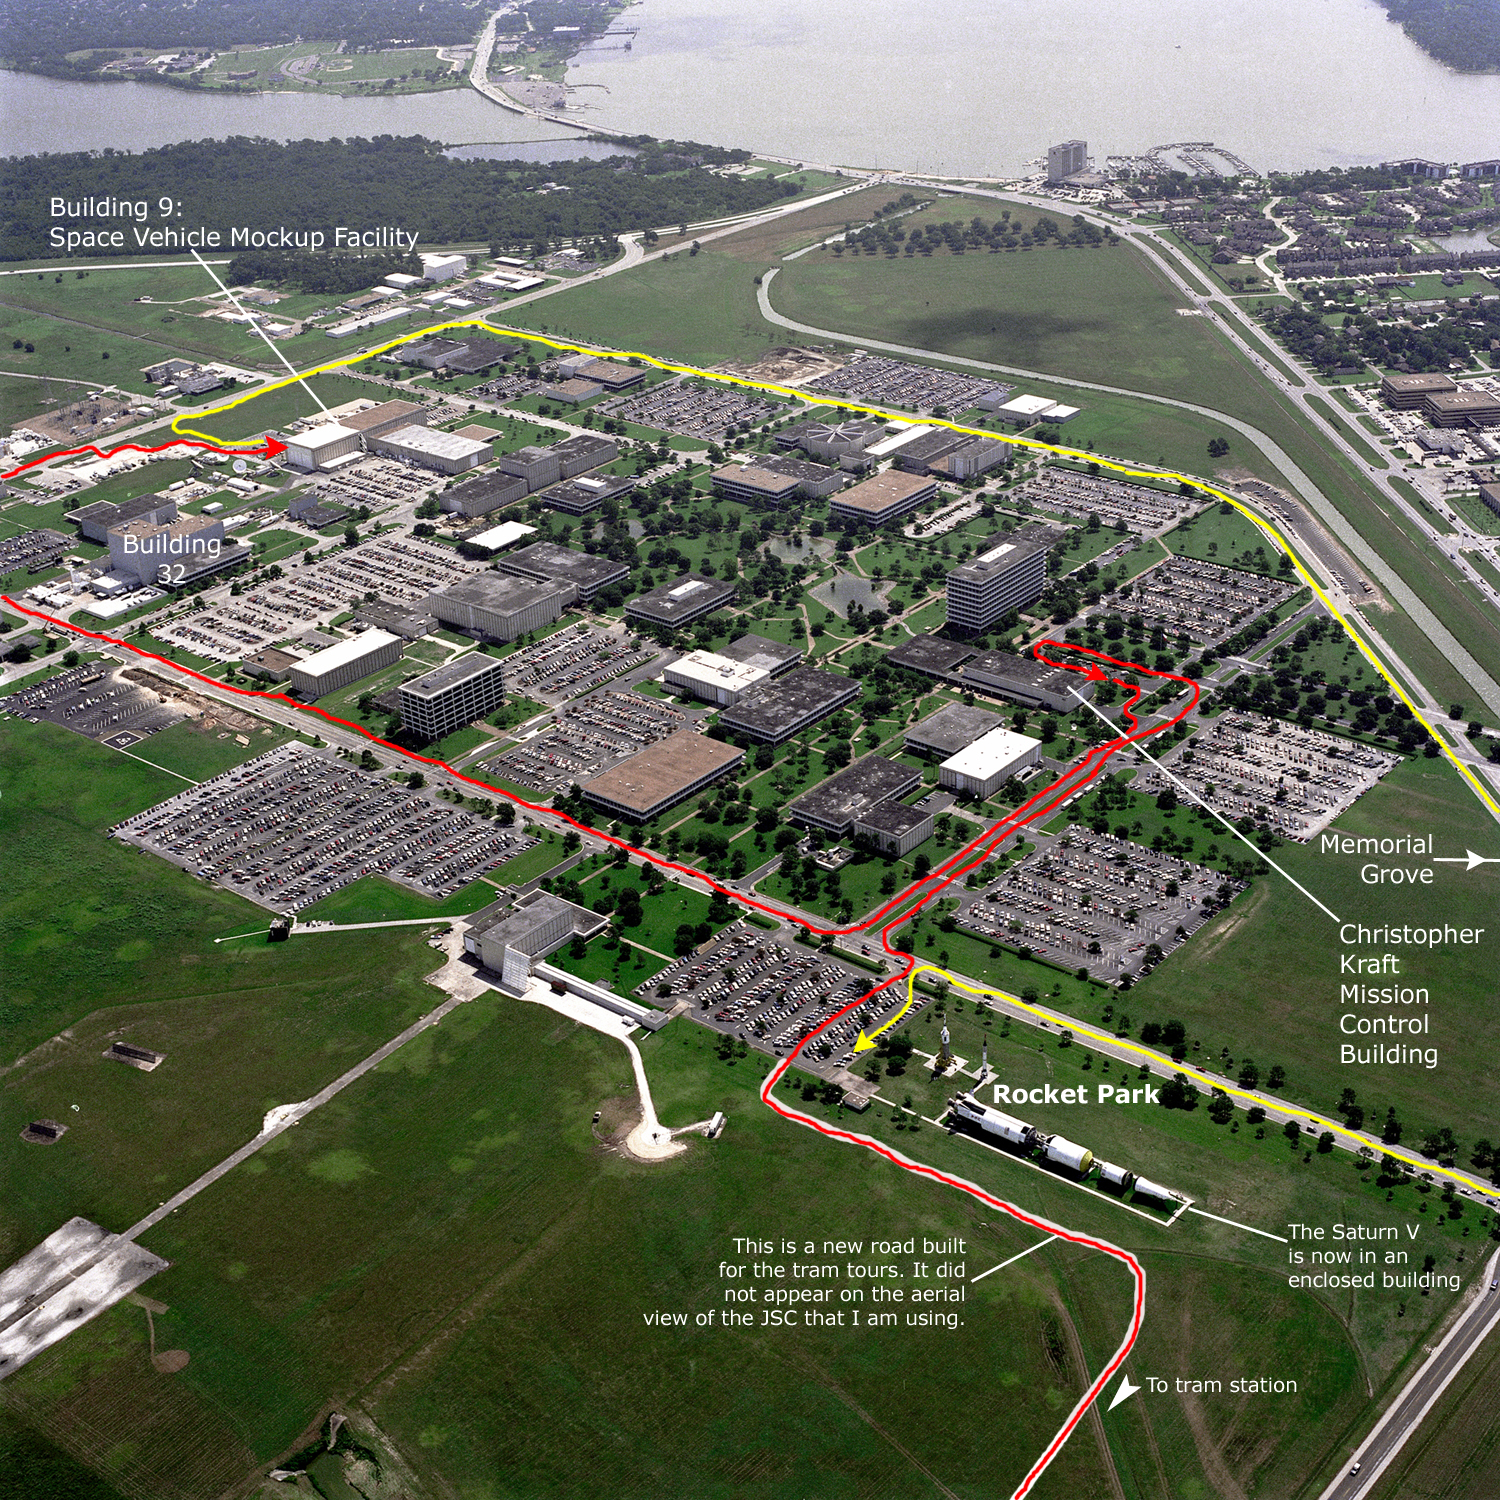
On this image, I've marked the route the tram took (I think I got it pretty close to correct, using our pictures as a guide) and the stops that it made. The publicity photo must be a bit old, for the special road built for the tram to get from SCH to the parking area for Rocket Park didn't even appear, and I had to add it. I've also marked the buildings at which we stopped.
To find the beginning of the tour, scroll the image to the lower right corner, and you'll see the road coming up towards Rocket Park (our last stop) from SCH.
So, you might find the aerial view interesting; it turned out to be a much better one than I could have gotten from Google Earth.
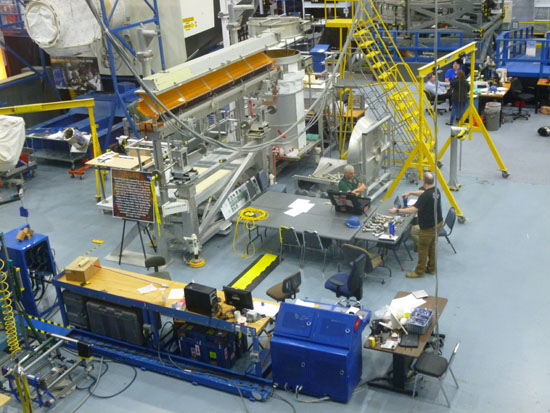
So, when our tram left the station, it first headed towards Independence Plaza- the short name for the area where the Independence space shuttle sits atop its carrier 747. This is an interesting view, because you can see the access tower that we will use later to visit both of these vehicles. The tram makes a U-turn here to head back towards a tunnel that it takes under the JSC boundary road and onto that new road that's been built for it. This road heads towards Rocket Park, and then makes a turn to run along the southwest side of the building housing the Saturn V. As I noted on the aerial view, that building is also new since the aerial view was taken. A good thing, too, because when we stop to tour it later, you'll find many interesting exhibits inside- exhibits that couldn't have been created out in the open. The tram continues across the parking lot for Rocket park, and then jogs over to the Christopher Kraft Mission Control Center.
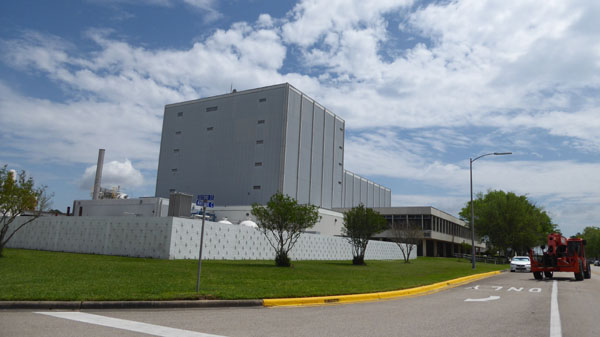
The Christopher Kraft Mission Control Center
|
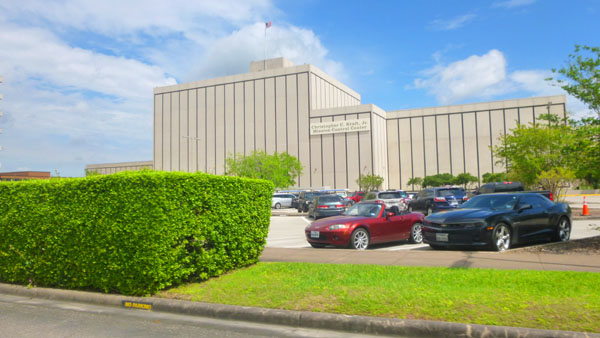
As our tram went down the street, our guide was telling us about our first stop, and I thought he said that the mission control center was in the building we were then passing, building 45, but that turned out to be the Project Engineering Building, just to the east of mission control. It was completed in 1966, and was originally designed to support the Gemini Program Office, Apollo Spacecraft Program Office, Central Data Branch offices, and Propulsion and Energy Systems Division. It also housed the JSC Technical Library.
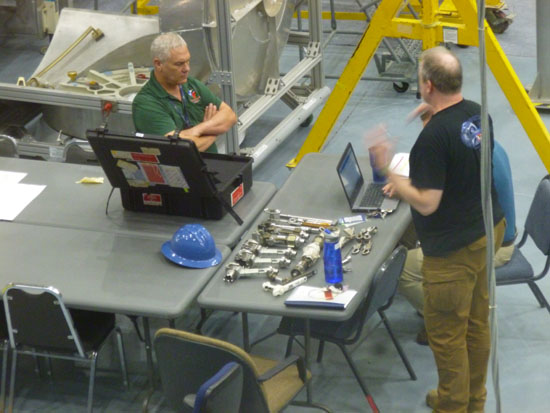
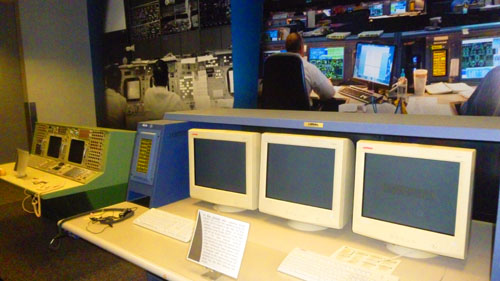
Our tram circled around past Building 45 to come to a stop on the east side of the mission control building. The tram for the previous tour was still parked there, but those folks were beginning to exit the building so that we could go in. We had a short orientation in the lobby, and then we were taken up to the third floor and into the viewing gallery just above and behind the Mission Control floor.
The first thing I noticed was that the room bore little resemblance to what we have all seen in movies and TV shows set in the 1960s during the runup to the series of Moon landings that began in July, 1969. In those scenes, it seemed as if all the equipment had been specially-built for its purpose; the various consoles and screens were generations older than what we have today. In fact, that was the first thing that our guide pointed out- the difference in what kind of computers and displays we see today versus those that were first in use. She pointed to a couple of displays just in front of the viewing gallery where some older generations of equipment were on display:
 |
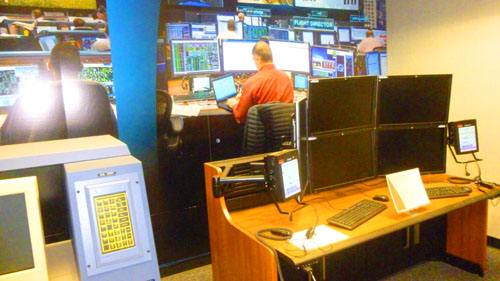 |
You can see in all our pictures of the main room how much the equipment has changed, and I also found it a bit amusing that many of the folks in the room were actually working on laptops that they'd set on the desks in front of them, sometimes eschewing all the complicated equipment and large displays that they have in front of them.
When we were all seated in the gallery, the building guide (not the one with us on the tram) spent some time explaining a bit about what we were all looking at. While she was talking, I made a couple of movies- just to capture the activity (or lack thereof) in the room. Even though an ISS space walk was going on at that very moment, I was impressed by how routine it all seemed to be. Anyway, it would be a good introduction for you to watch one or both of these movies to get the feel of the room:
|
(Mouseover Image Above for Video Controls) |
(Mouseover Image Above for Video Controls) |
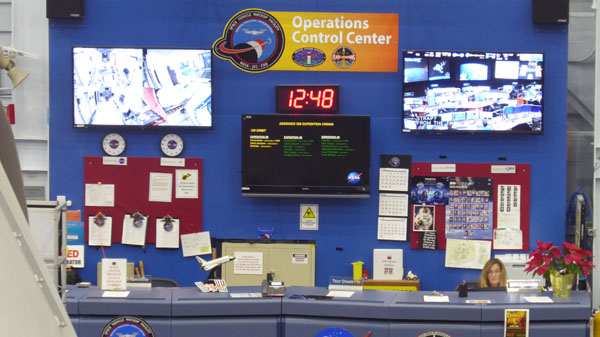
The MCC currently houses just this one operational control room; from here, flight controllers command, monitor, and plan operations for the ISS. This room has many computer and data-processing resources to monitor, command and communicate with the station. The ISS control room operates continuously. We were told that there is a second control room in this building; it was formerly the control room for flights of the space shuttle, and is sometimes utilized for the ISS when there's a need to repair or upgrade equipment in the main control room. They also use it for training. I was also surprised to learn that should this facility be out of commission because of a hurricane or some other event, there is a duplicate control room that can be activated in Round Rock, Texas, just north of Austin.
|
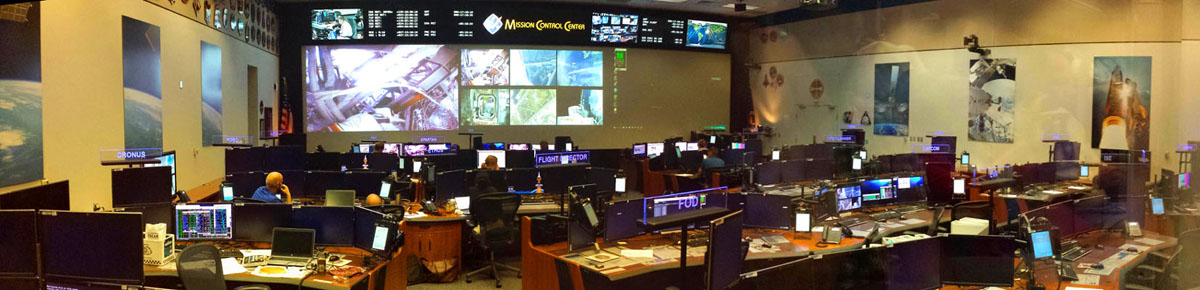
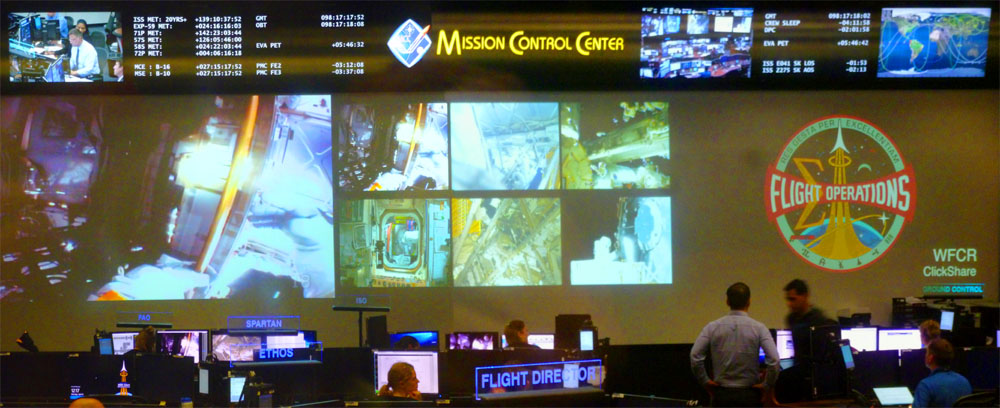
We took a lot of pictures from the peanut gallery; the control room is a pretty neat place. I lucked into a series of three pictures that fit together very well into a broad panorama, and I have put the resulting image above. Obviously, the main display with all the separate images from the ISS wes really neat, and a large view of it is below:
|
Finally, I've taken the best of all the other pictures that we all took while here in the gallery, and I have put thumbnails for them below:
|
We had a chance to ask questions before our guide herded us back downstairs and out to our waiting tram. There was already another on pulling in behind ours. As soon as we were loaded again, the tram pulled away from the Kraft Mission Control center and headed northwest through the complex to our next stop.
|
Its principal features are two test chambers, one larger and one smaller. Both are cylindrical chambers that have the ability to provide a near vacuum, and have configurable lighting systems for simulating sunlight from a variety of angles.
The larger chamber has a diameter of 55 feet, with a circular floor that can be rotated 180°. Test subject equipment can be maneuvered using four overhead cranes, each with a carrying capacity of 50,000 pounds. Equipment can be lifted into and out of the chamber using 100,000 pound cranes located outside the chamber. In addition to solar lighting arrays, the facility is capable of generating thermal plasma fields of a type experienced in the outer atmosphere and low earth orbit. There are two man-sized airlocks, one at ground level, and one at 31 feet; these can be used for staging safety personnel during testing involving humans, and can be separately used for small-scale altitude tests involving low air pressures.
NASA remodeled and upgraded the chamber to test the James Webb Space Telescope. As of 2013, it is the largest high-vacuum, cryogenic-optical test chamber in the world- over 90 feet tall. It is equipped with a gaseous helium shroud capable of lowering temperatures to -439.9 °F. Additional test support equipment includes mass spectrometers, infrared cameras and television cameras, all of which are used to monitor and record the tests conducted here.
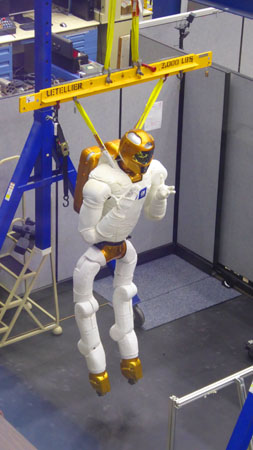
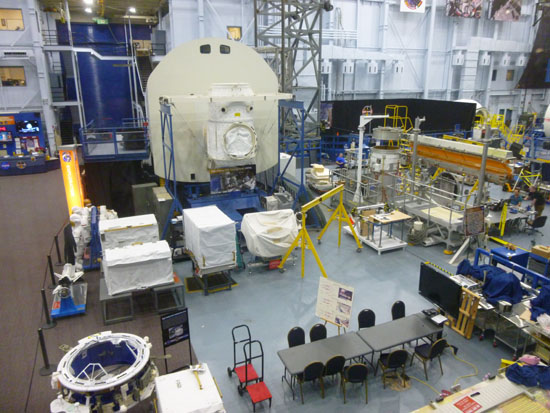
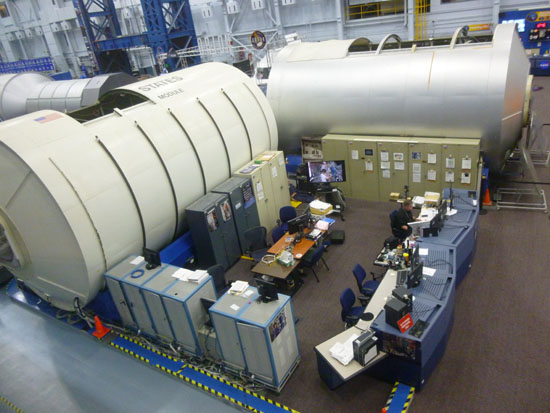
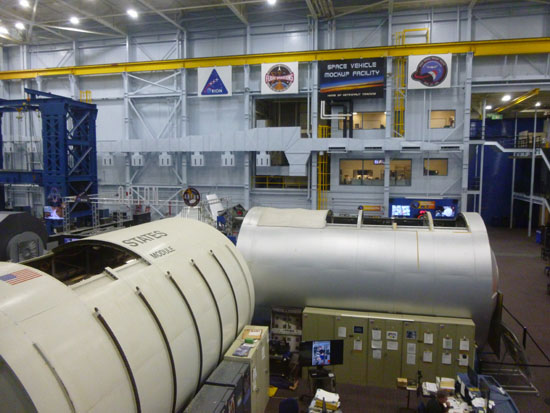
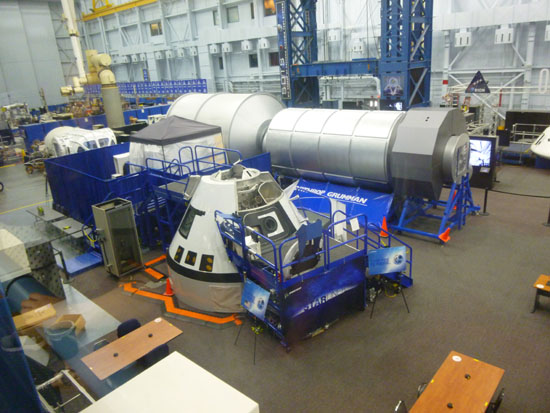
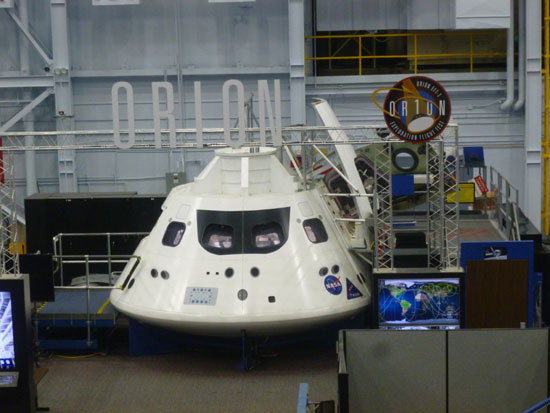
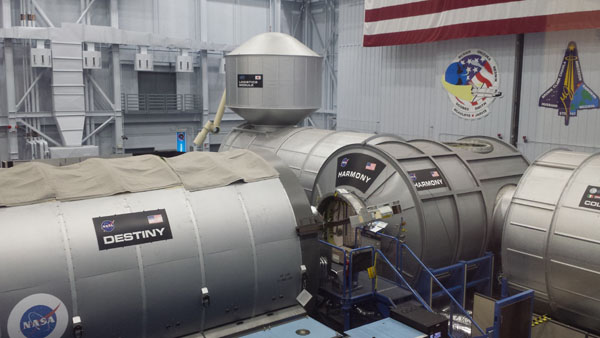
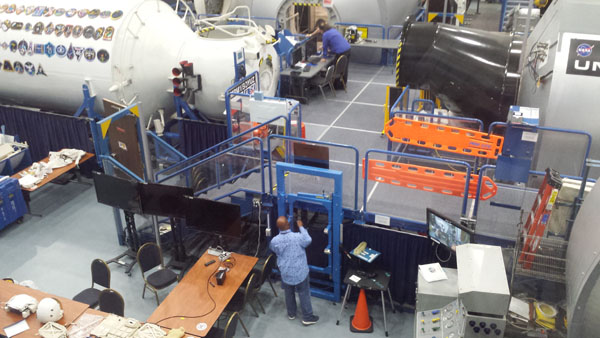
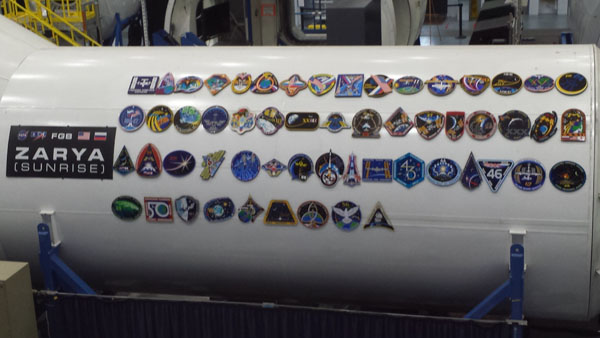
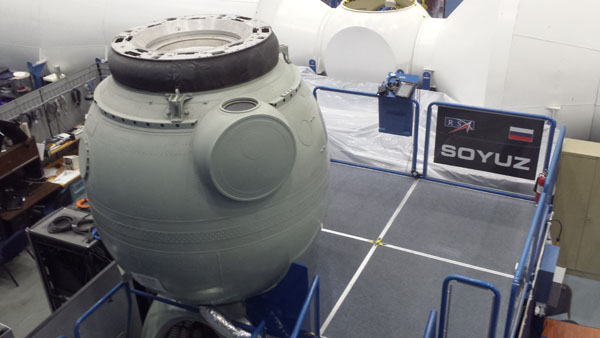
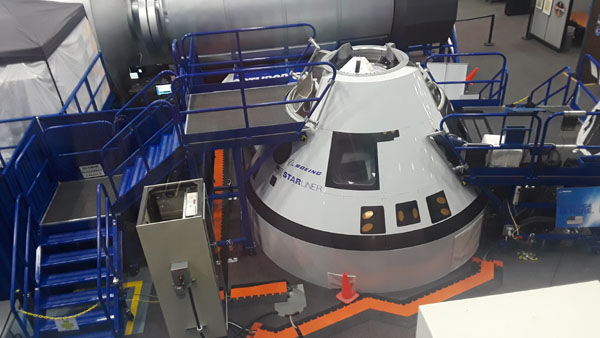
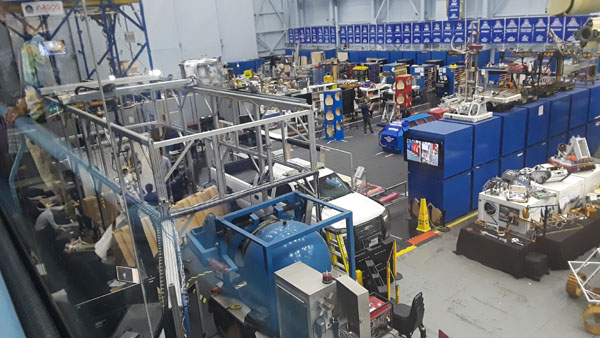
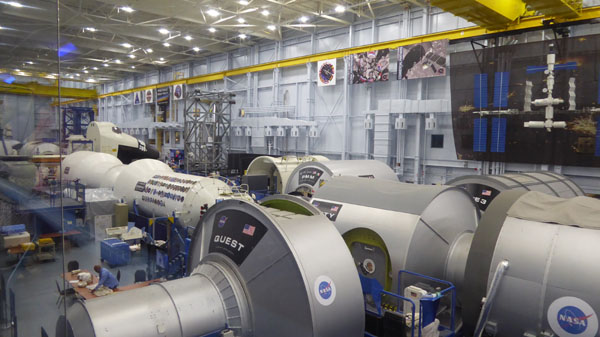
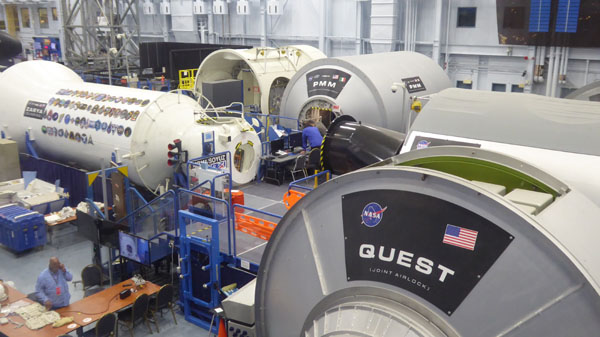
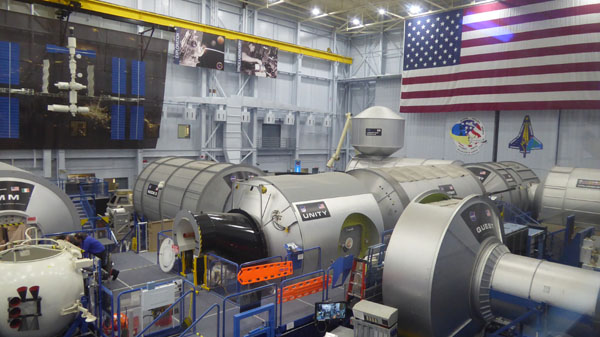
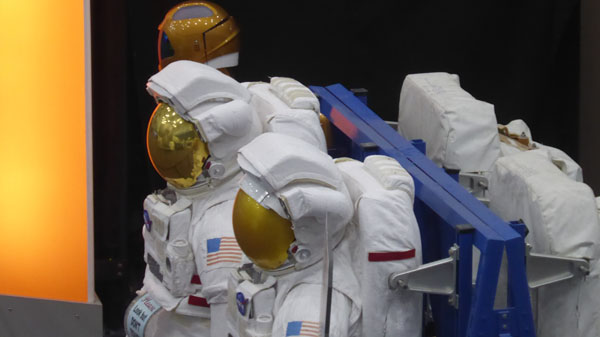
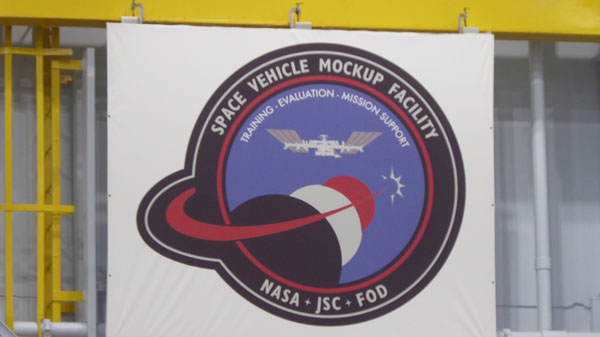
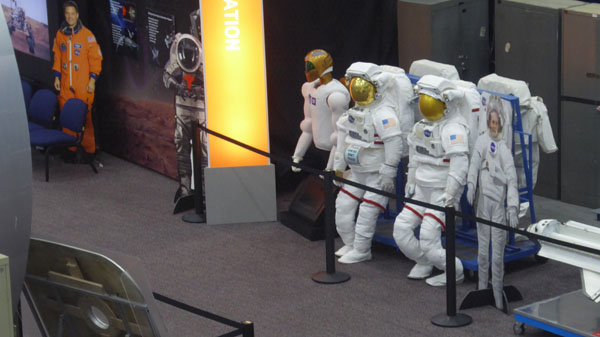
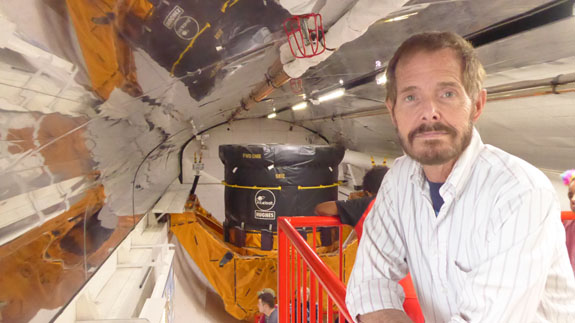
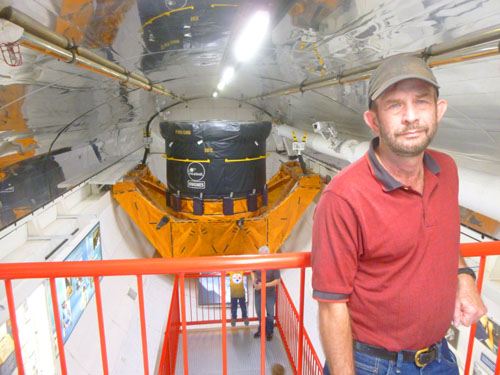
The Space Vehicle Mockup Facility (Building 9)
|
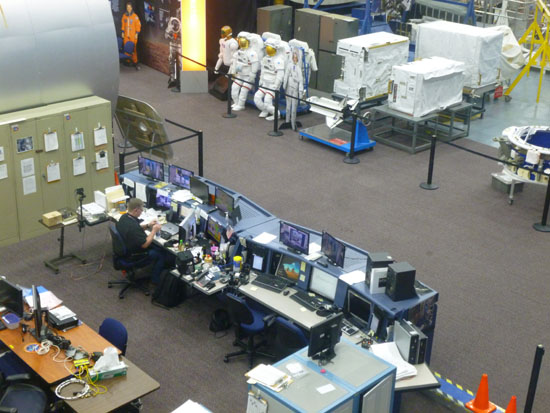
The International Space Station modules are 1:1 scale and are maintained as accurate as possible to the real spacecraft in orbit. The facility also has a 1/6th gravity simulator and Mars Rover test vehicles. An industrial door at the North End, and overhead cranes allows the installation of new mockup spacecraft to be loaded into the facility.
The enclosed balcony overlooking the testing floor is as long as the building but fairly narrow, so tours through here necessitate that large groups like ours be allowed up the stairs and down the length of the balcony a few people at a time. Knowing that we would be taking lots of pictures, we hung back to be at the tail end of our group, spending some time looking around the large lobby:
|
|
I think it was a good decision to hang back and be at the tail end of our group; it allowed us to take rather more pictures and not worry about everyone looking through the windows and perhaps getting in the way.
|
About a third of the way down the balcony, I made one movie looking out across the floor of the Mockup Facility, and you can use the player below to watch it:
|
(Mouseover Image Above for Video Controls) |
So, between Nancy, myself, and Fred, I think we photographed just about everything in the facility, from just about every angle. I want to include a lot of those pictures here. To make it easy for you to zip through them, I'm putting them into a couple of slide shows.
|
|
Looking at all the space vehicles and equipment was really interesting, but I was struck by how little activity there actually was on the vehicle floor. That is, I guess, because space has become routine, and there is no urgency as there was to put a man on the moon originally. The whole facility looked more like a geek engineer's sandbox. We all headed back downstairs and to our tram to drive around the boundary road to our last stop- Rocket Park.
|
NASA remembers all of these brave souls every year as part of their Day of Remembrance. This ceremony takes place in different ways at all of the NASA facilities. At NASA Johnson Space Center, there is a Memorial Grove of trees planted in memory of fallen astronauts and mission control personnel, and we passed this grove on the way to our last stop at Rocket Park.
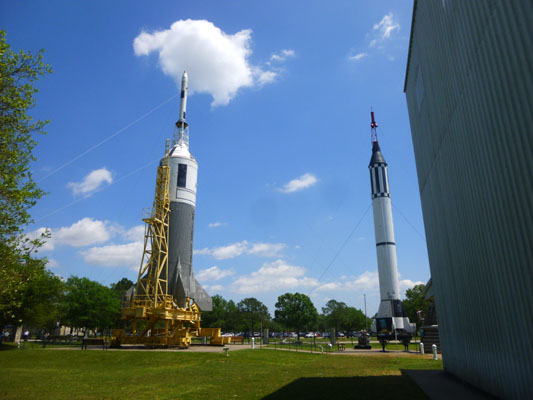
Rocket Park
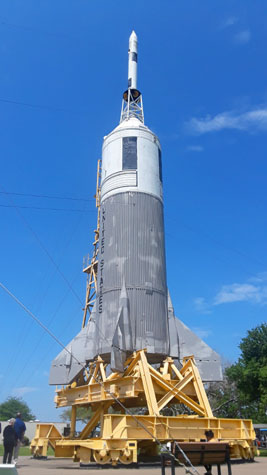
Little Joe II
|
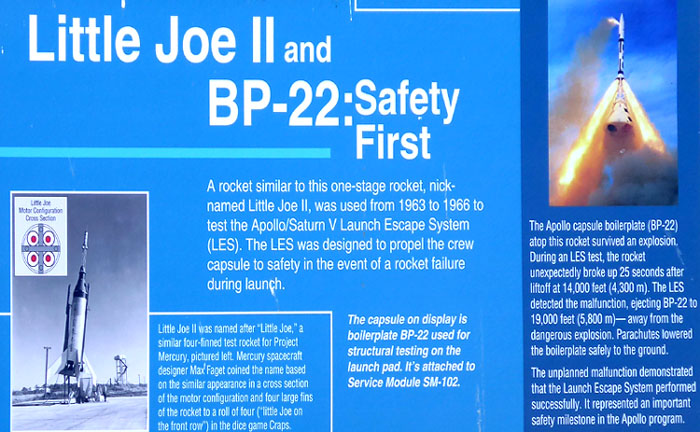
The vehicle's first launch, in 1963, carried a dummy payload consisting of an aluminum shell in the basic shape of the Apollo command module, with an inert LES attached, and demonstrated the rocket would work for the A-001 launch. This occurred in 1964, with a boilerplate BP-12 command module, and performed the first successful abort using a live LES. A third launch later that same year, tested the effectiveness of the LES when the pressures and stresses on the spacecraft were similar to what they would be during a Saturn IB or Saturn V launch. The fourth flight in 1965, was designed to test the escape system at a high altitude (although the abort actually occurred at low altitude due to a failure of the Little Joe II booster). The final launch, on January 20, 1966, carried the first production spacecraft, CSM-002.
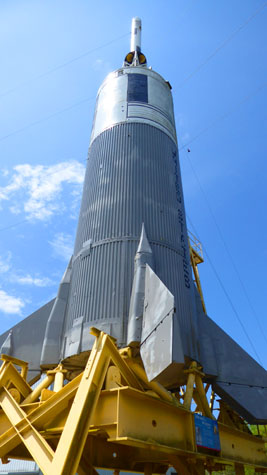
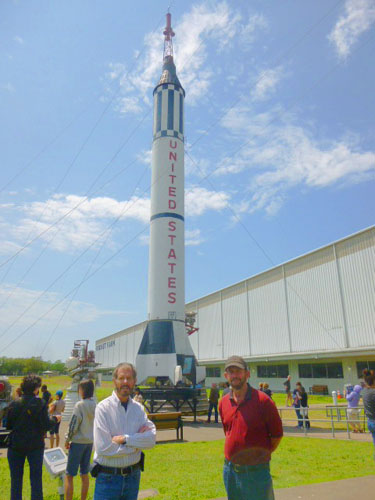
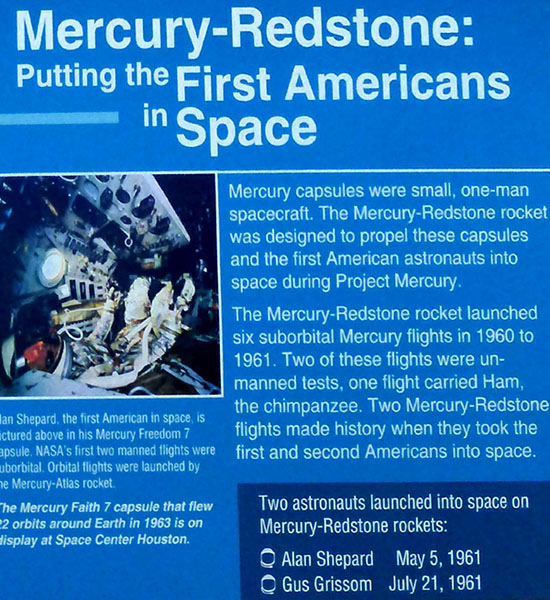
The Mercury-Redstone Launch Vehicle
|
|
Mercury-Redstone flights were designated with the prefix "MR-". Confusingly, the Mercury-Redstone boosters used for these flights were designated in the same way, usually with different numbers. (In photographs, this designation can sometimes be seen on the rocket's tail end.) Two rockets, MR-4 and MR-6, were never flown.
Although there had been rumors that NASA in the very beginning of Project Mercury had intended to launch each astronaut on a suborbital mission before beginning orbital Atlas flights, they only purchased eight Mercury-Redstone boosters, one of which was damaged in the unsuccessful MR-1 launch and not reused, and another used for the MR-BD flight (the original schedule was for one unmanned Mercury-Redstone flight, one chimpanzee flight, and six manned flights). Since Alan Shepard and Gus Grissom's flights were successful and since the Soviet Union had flown two orbital manned space flights by the late summer of 1961, there was no need to continue with Redstone missions.
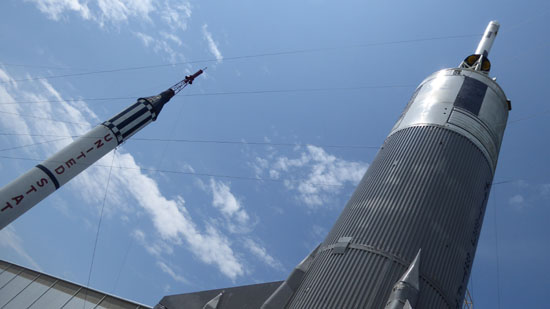
Here are some additional pictures featuring the Little Jim II and Mercury-Redstone Launch Vehicles:
|
|
|
 |
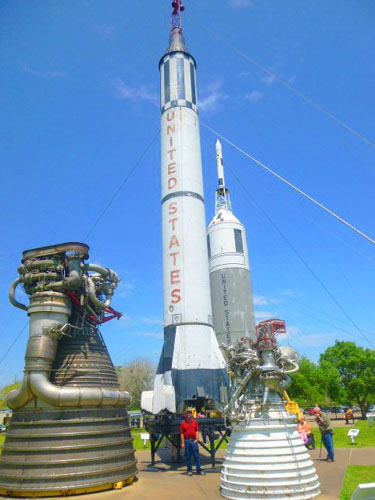
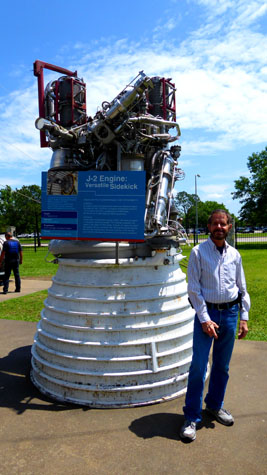
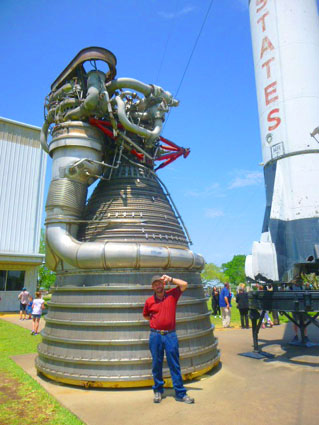
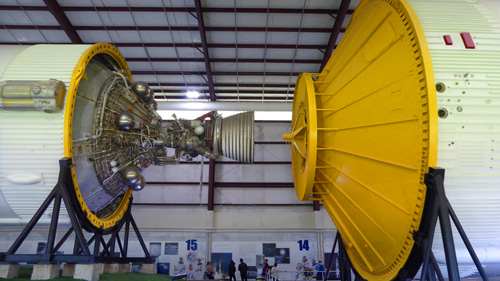
Engine Components
|
Here are the other two engines that were on display outside:
|
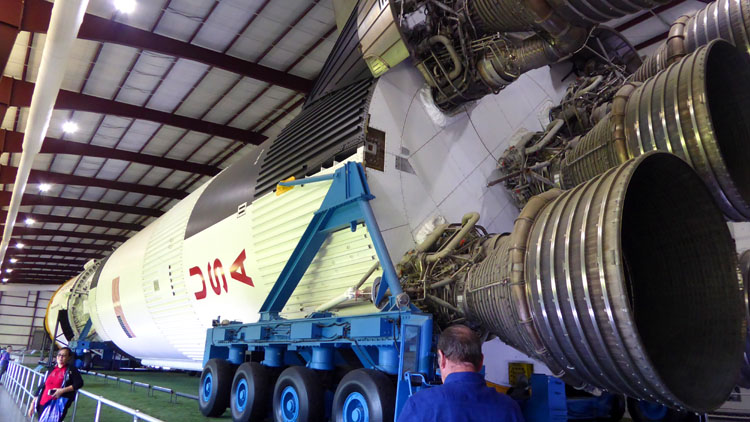
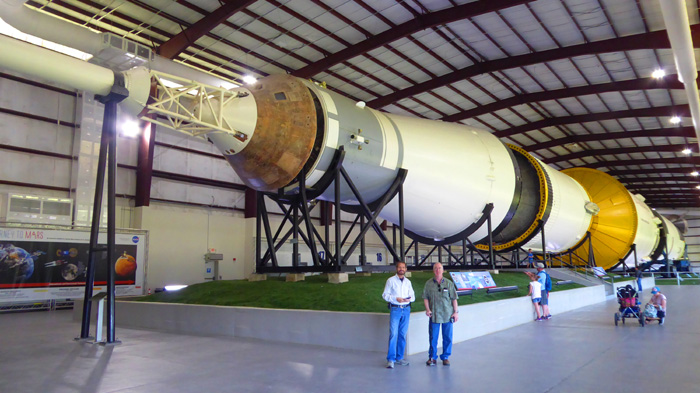
Now it was time to go inside the long warehouse structure that houses an entire Saturn V rocket (laying on its side, of course).
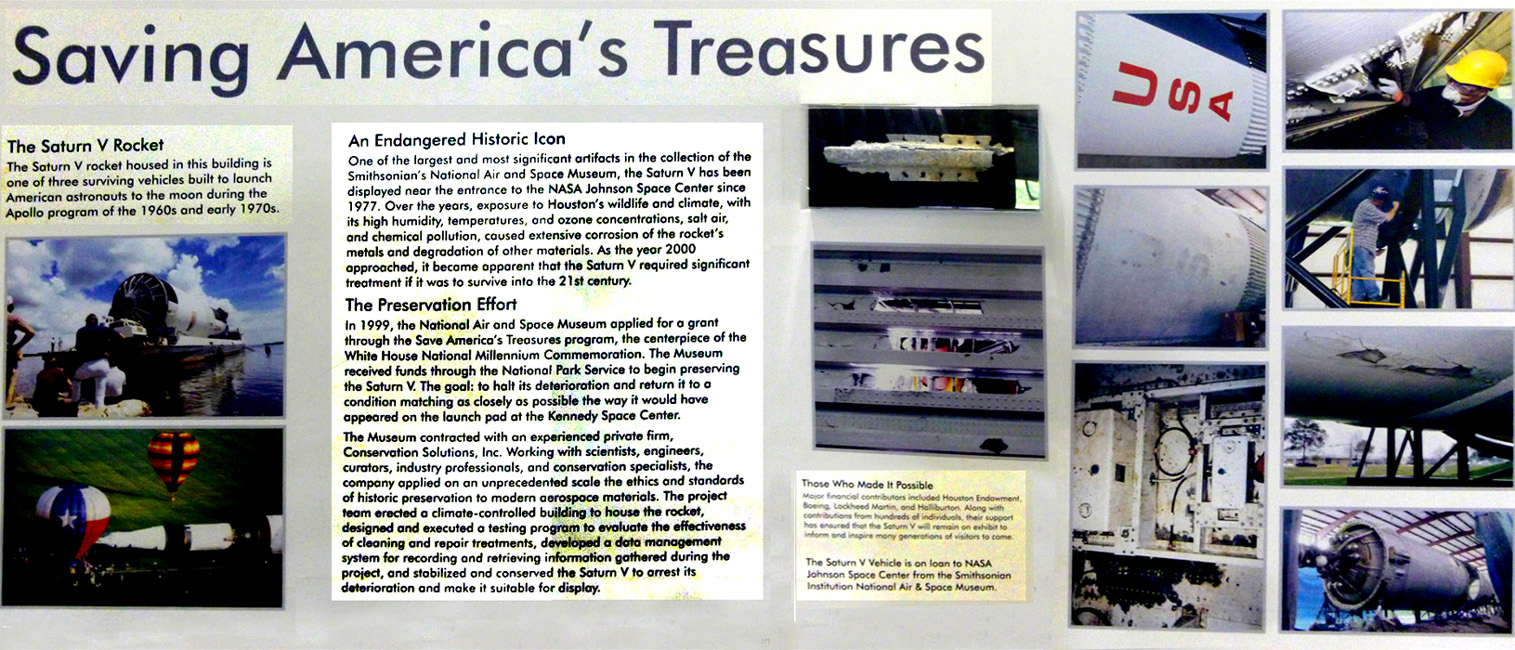
The Saturn V Rocket
|
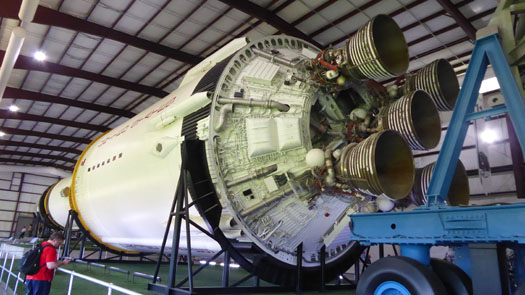
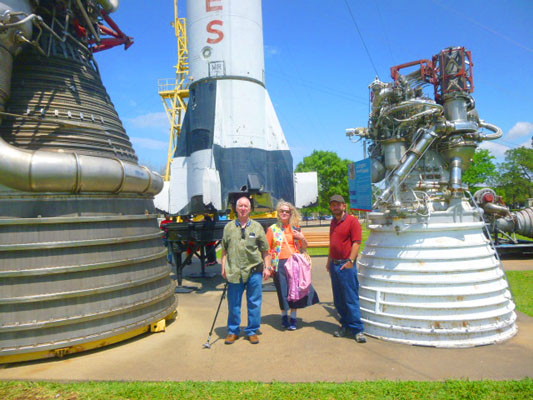
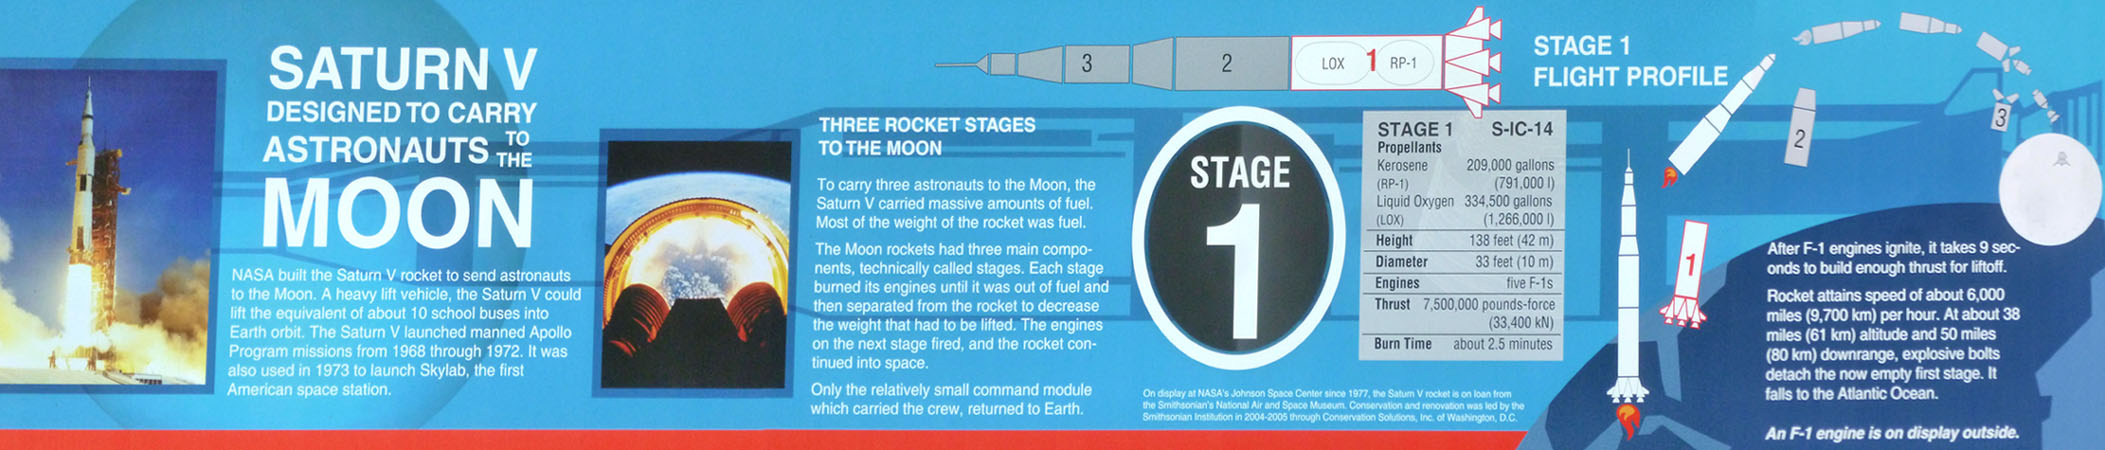
There are only three Saturn V rockets on display in the world. The rocket at NASA Johnson Space Center is the only one comprised of all flight-certified hardware. The other two rockets are made of flight hardware, mock-ups and test components. The three segments, called stages, contain the powerful engines needed to lift off, entering orbit to reach the Moon. In total, 13 Saturn V rockets launched into space.
The Saturn V rocket stands 363 feet tall and has dazzled viewers since its first un-crewed takeoff, the Apollo 4 mission in 1967. When fueled and ready for launch, the rocket can weigh 6.2 million pounds. That is almost the same weight as 39 space shuttle orbiters.
Flown from 1967 to 1973, the rocket launched 27 astronauts into space with six successful missions landing men on the Moon. The Saturn V also launched Skylab, America’s first space station, into orbit in its final mission. Astronauts could immediately feel the impressive power of Saturn V propelling them through Earth’s atmosphere into orbit.
While the Saturn V rocket began the process, the entire vehicle did not, of course, go to the Moon. Only the Apollo spacecraft (capsule and service module) and the lunar lander went to the Moon. The rest of the rocket (essentially the first three stages) served only to lift those moon-going components into orbit and then put them on course for the moon. The Saturn V on display here was broken into three major pieces so the visitor could see how it worked.
Stage 1
|
|
The first stage (S-IC Stage) is the largest with five F-1 engines. This was used for only two minutes and 47 seconds, which was enough time to get the rocket 42 miles above Earth. After the first stage used its fuel, it fell into the ocean. In one of the pictures above, you can see the information sign for Stage. I photographed it so you could have a look. That sign is in the scrollable window below:
 |
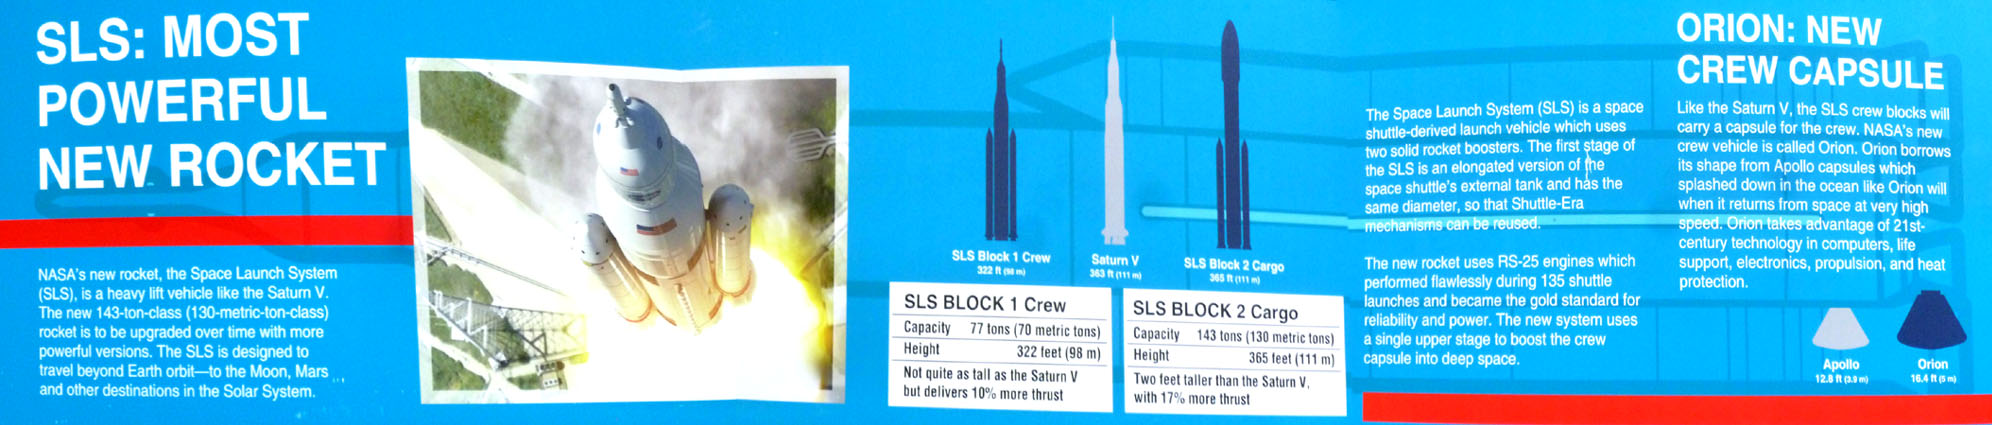
Before we look at the second stage, there was another informational sign right between the top of Stage 1 and the engines of Stage 2. This sign described the heavy launch vehicle that took the place of Saturn V, and you might be interested in learning about it. That sign is in the scrollable window below:
 |
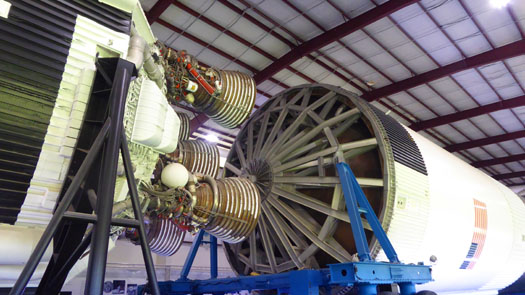
Stage 2
|
|
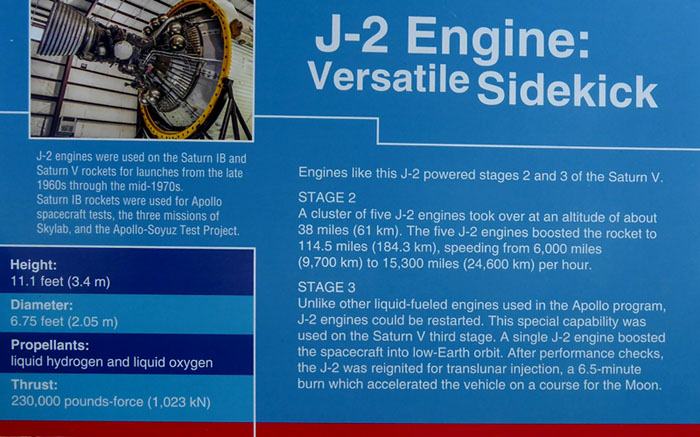
The second stage (S-II Stage) which fired for nine minutes and nine seconds, took the rocket into space. This stage was then detached after which it fell to Earth and burned in the atmosphere (at least there haven't been any reports of one NOT burning up). I got a good closeup photo of one of the Stage 2 engines. There was also an interesting informational sign all about Stage 2, and I have put my photograph of it in the scrollable window below:
 |
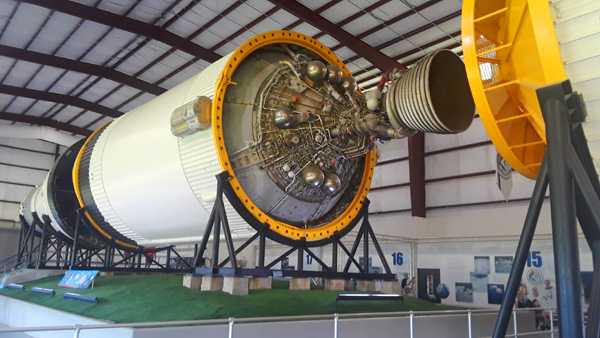
Stage 3
|
|
The descriptive placard for Stage 3 is in the scrollable window below:
 |
The third stage then floated into space. Some third stages were crashed into the Moon on purpose to measure the “Moon quakes” they created.
The Command and Service Module and the Lunar Module
And what was that job? To get the Command Module, Service Module, and Lunar module into orbit and then to insert them into lunar trajectory and send them on their way. To see how the modules worked from that point, have a look at the very interesting explanation that I photographed and put into the scrollable window below:
 |
I don't think I'd ever taken the time to investigate exactly how all the modules fit together, and I found the information here to be the most interesting of the whole Saturn V exhibit.
|
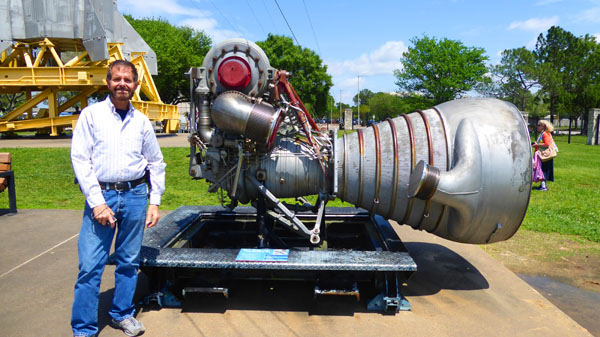
For the final two pictures of the launch vehicle, here are Karl and Fred standing next to the Service and Lunar Modules and here, at the very top of the rocket, the Command Module, with the Launch Escape System still attached. (In an emergency, the Command Module can be separated and a rocket in the escape system fired to move the module away from the rest of the launch vehicle. This entire eystem is ejected either when it is no longer needed or can no longer effectively protect the Command Module and astronauts inside.)
The Apollo era signified a new age of advancements in technology and space exploration for the United States. Many technologies from the first lunar launches, especially the Saturn V, inspired future models of spacecraft that will one day take astronauts deeper into the cosmos. The 30-story tall rocket has been on loan from the Smithsonian’s National Air and Space Museum collection since 1977 and was recently restored in 2007. The Saturn V (in general, not this one, of course) made 9 trips into outer space (six of which landed on the Moon) carrying 27 Apollo astronauts.
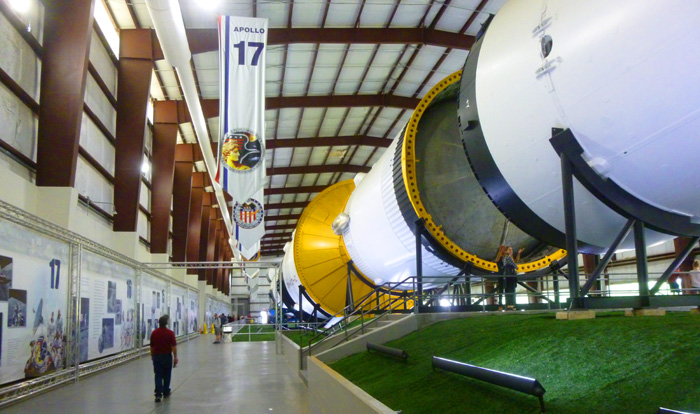
NASA Space Missions
|
Since most people enter the Saturn V building from the entrance you can see in the distance, the mission descriptions actually begin near that door, and end where I am standing with Apollo 17.
I found the displays so interesting that I did my best to photograph each of them (sometimes in a single photograph but sometimes, when I couldn't get back far enough, in two or three separate pictures). I would like to let you have a look at these displays yourself, and so will put each of them on this page. And, because you probably would have entered the building by the more common route, and would have seen them in order, I'll put them in order here. I apologize in advance if any of them turn out to be a bit fuzzy; if I find any that are unreadable, I will transcribe them for you (provided I can read them from my photographs).
These displays will all be in scrollable windows so that they can be large enough for you to read here online. The vagaries of web site coding are such that scrollable windows always default to the upper left corner, when they are first accessed. You will want to immediately scroll all the way to the right, to the upper right corner, to find the Apollo mission number and the "beginning" of the display. So, here are those wall displays, in order, from the beginning:
 |
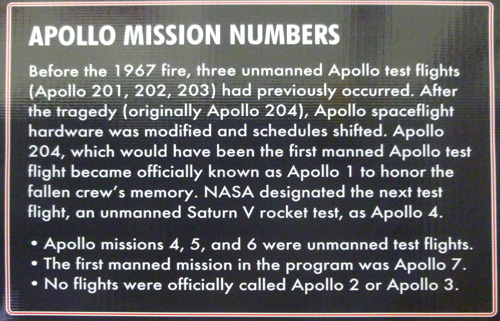
I never knew much about the Apollo mission numbers, and I really don't think that most people did. I did know that it was Apollo 11 that accomplished the first moon landing, and I knew that the fire in 1967 occurred on a manned test, but if asked I wouldn't have been able to explain why there weren't ten missions before Apollo 11.
|
It explains the numbers, but not really why NASA chose to skip numbers 2 and 3 in their sequence. I could have understood if they had skipped 2, 3, and 4, honoring the astronauts who lost their lives as number 1, then inserting the first three unmanned test flights as 2, 3, 4, then making the next three unmanned test flights 5, 6, and 7, and then, finally, the next manned mission Apollo 8. So there's a missing number somewhere, but I supposed it matters very little.
Anyway, let's pick up with the second, and first successful, manned mission. So that I can make the displays a bit smaller, I am going to transcribe the information about the astronauts, and put it below the scrollable window. This information was printed relatively small, and to make it readable in these composite photographs mean that they have to be larger than really necessary.
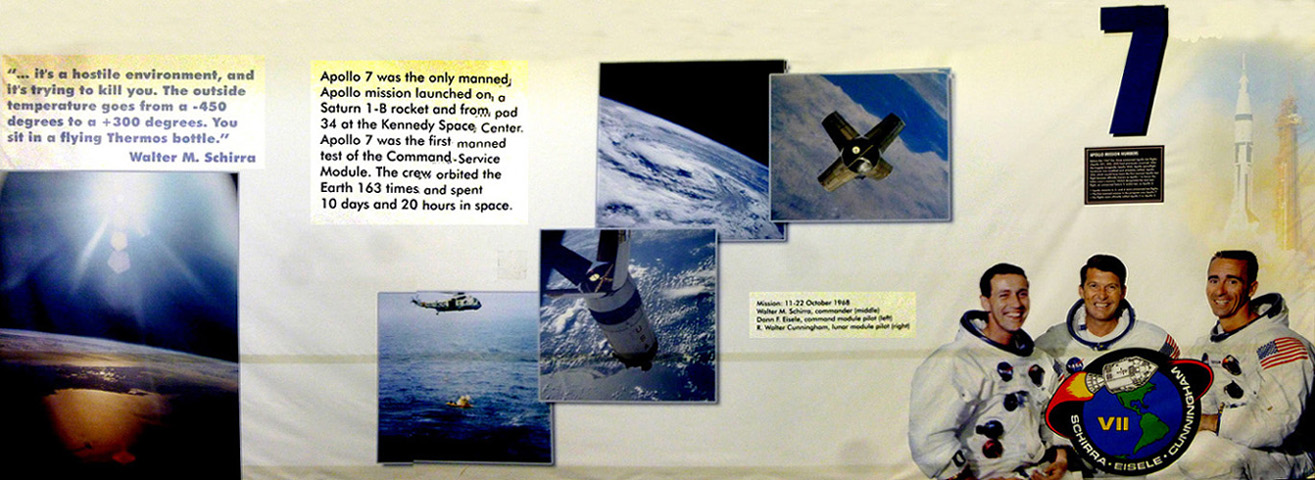 |
| Mission: 11-22 October 1968. Walter M. Schirra, commander (middle), Donn F. Eisele, command module pilot (left), R. Walter Cunningham, lunar module pilot (right). |
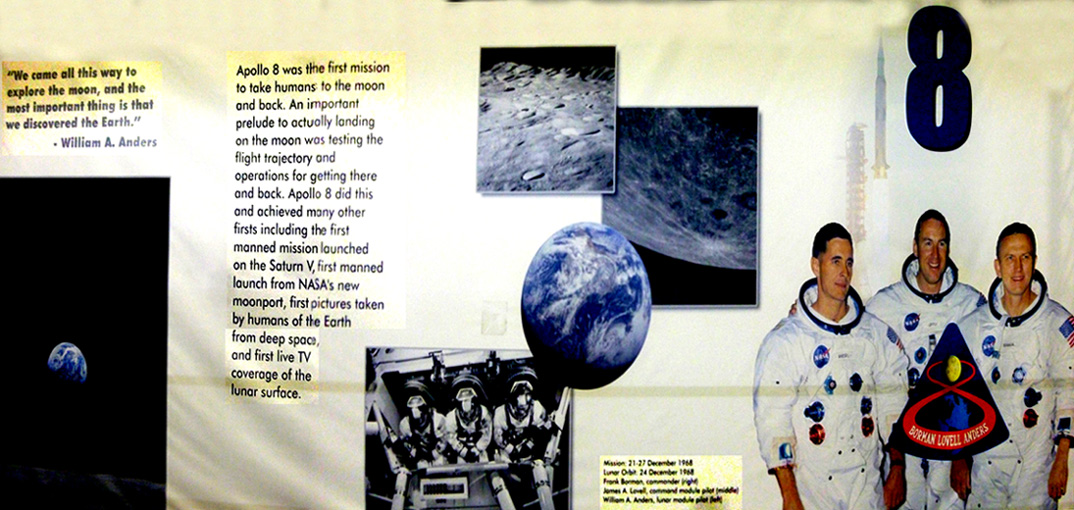 |
| Mission: 21-27 December 1968. Lunar Orbit: 24 December 1968. Frank Borman, commander (right), James A. Lovell, command module pilot (middle), William A. Anders, luncar module pilot (left) |
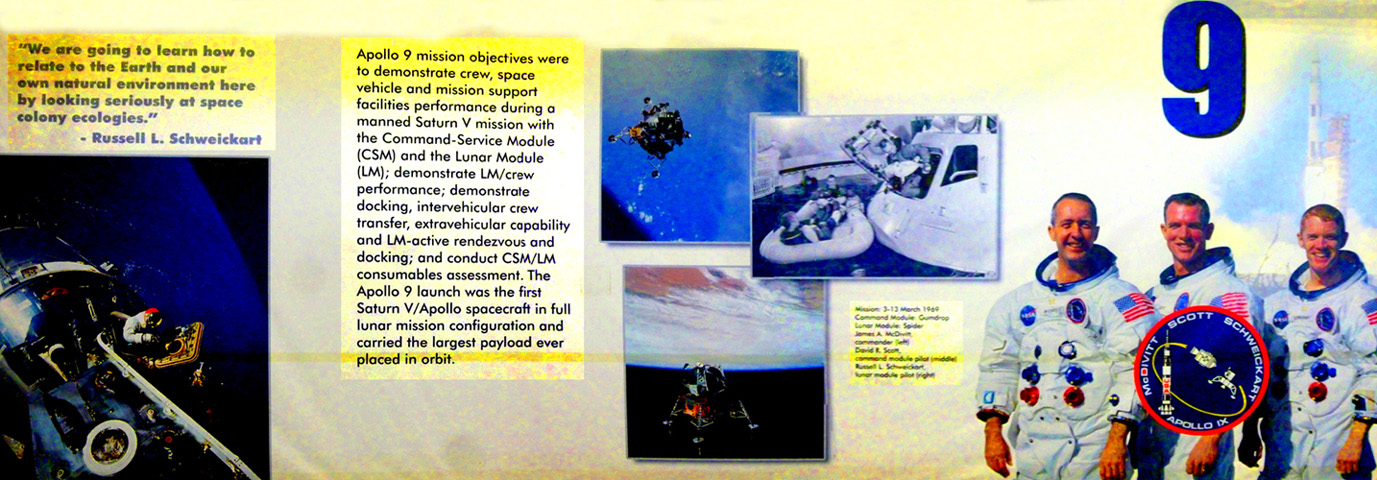 |
| Mission: 3-13 March 1969. Command Module: Gumdrop; Lunar Module: Spider. James McDivitt, commander (left), David R. Scott, command module pilot (middle), Russell L. Schweickart, lunar module pilot (right) |
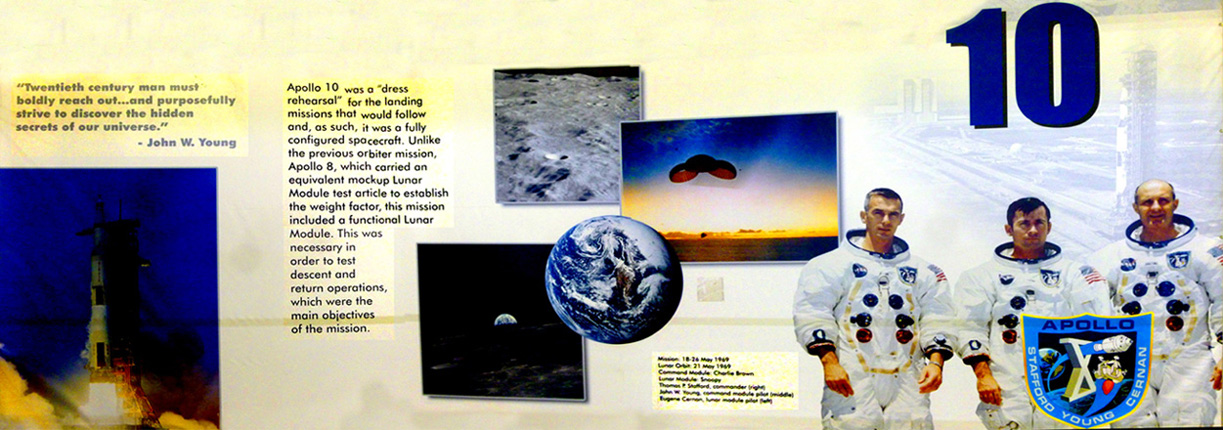 |
| Mission: 18-26 May 1969. Lunar Orbit: 21 May 1969. Command Module: Charlie Brown; Lunar Module: Snoopy. Thomas P. Stafford, commander (right), John W. Young, command module pilot (middle), Eugene Cernan, lunar module pilot (left) |
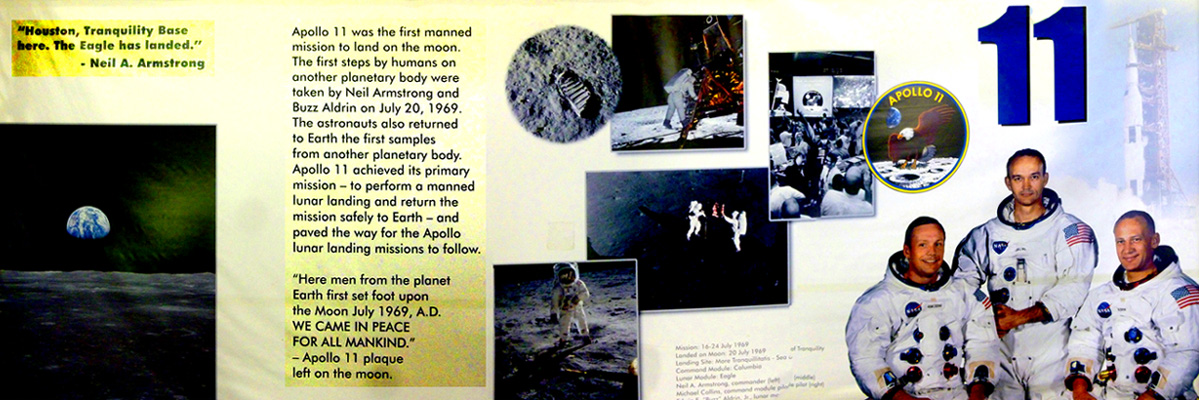 |
| Mission: 16-24 July 1969. Landed on Moon: 20 July 1969. Landing Site: Mare Tranquillitatis (Sea of Tranquility). Command Module: Columbia; Lunar Module: Eagle. Neil A. Armstrong, commander (left), Michael Collins, command module pilot (middle), Edwin E. "Buzz" Aldrin, Jr., lunar module pilot (right) |
 |
| Mission: 14-24 November 1969. Landed on Moon: 19 November 1969. Landing Site: Oceanus Procellarium (Ocean of Storms). Command Module: Yankee Clipper; Lunar Module: Intrepid. Charles Conrad, Jr., commander (left), Richard F. Gordon, command module pilot (middle), Alan L. Bean, lunar module pilot (right) |
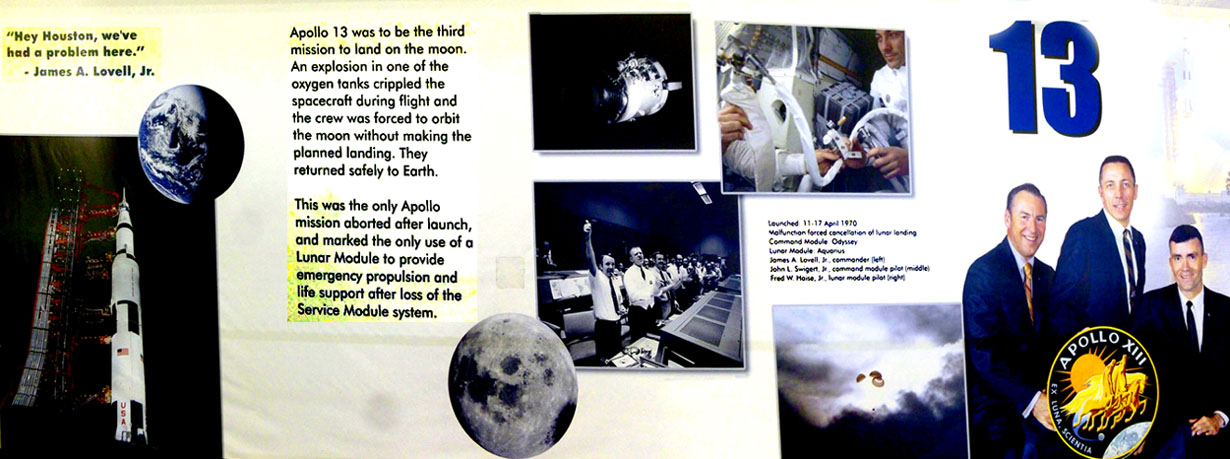 |
| Mission: 11-17 April 1970. Malfunction forced cancellation of lunar landing. Command Module: Odyssey; Lunar Module: Aquarius. James A. Lovell, Jr., commander (left), John L. Swigert, Jr., command module pilot (middle), Fred W. Haise, Jr., lunar module pilot (right) |
 |
| Mission: 31 January - 9 February 1971. Landed on Moon: 5 February 1971. Landing Site: Fra Mauro. Command Module: Kitty Hawk; Lunar Module: Antares. Alan B. Shepard, Jr., commander (middle), Stuart A. Rooso, command module pilot (left), Edgar D. Mitchell, lunar module pilot (right) |
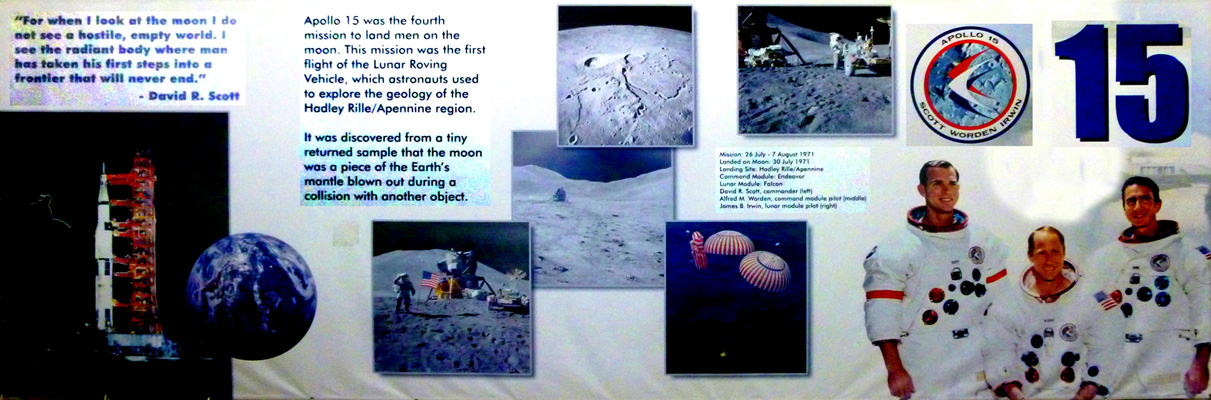 |
| Mission: 26 July - 7 August 1971. Landed on Moon: 30 July 1971. Landing Site: Hadley Rille/Apennine. Command Module: Endeavor; Lunar Module: Falcon. David R. Scott, commander (left), Alfred M. Warden, command module pilot (middle), James B. Irwin, lunar module pilot (right) |
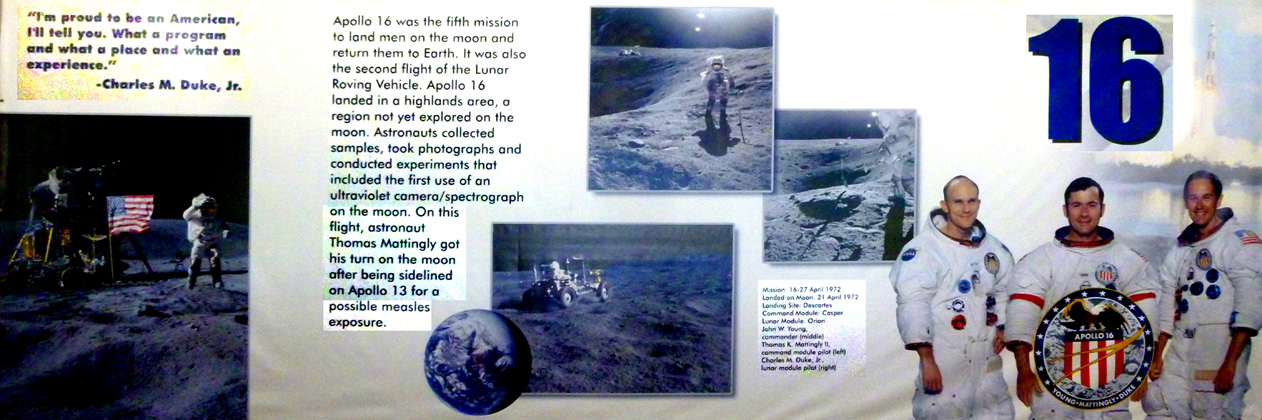 |
| Mission: 16-27 April 1972. Landed on Moon: 21 April 1972. Landing Site: Descartes. Command Module: Casper; Lunar Module: Orion. John W. Young, commander (middle), Thomas K. Mattingly II, command module pilot (left), Charles M. Duke, Jr., lunar module pilot (right) |
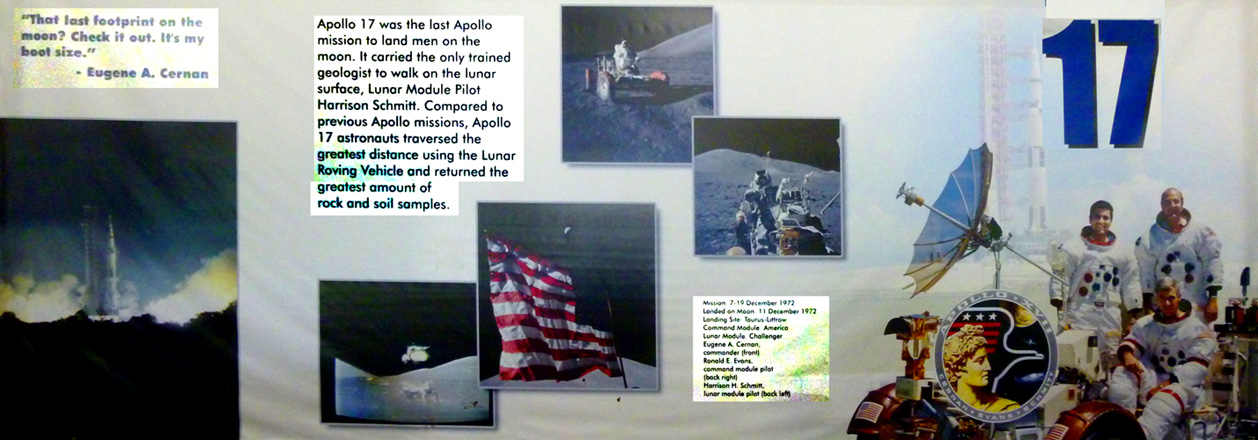 |
| Mission: 7-10 December 1972. Landed on Moon: 11 December 1972. Landing Site: Taurus-Littrow. Command Module: America; Lunar Module: Challenger. Eugene A. Cernan, commander (front), Ronald E. Evans, command module pilot (back right), Harrison H. Schmitt, lunar module pilot (back left) |
So, those are the very interesting and informative displays about all the Apollo missions; I certainly learned a lot that I hadn't known or remembered. At the very beginning of the wall, right by the entrance was one more wall poster- this one devoted to the display of the Saturn V itself, and you might find it interesting to read. It is in the scrollable window below:
 |
|
|
(Mouseover Image Above for Video Controls) |
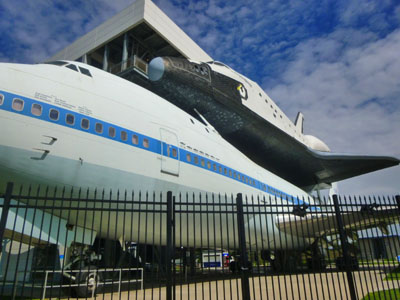
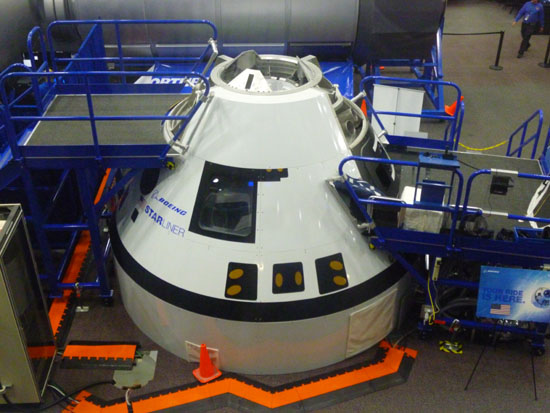
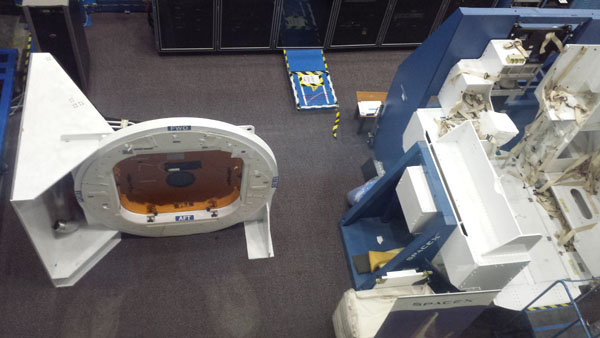
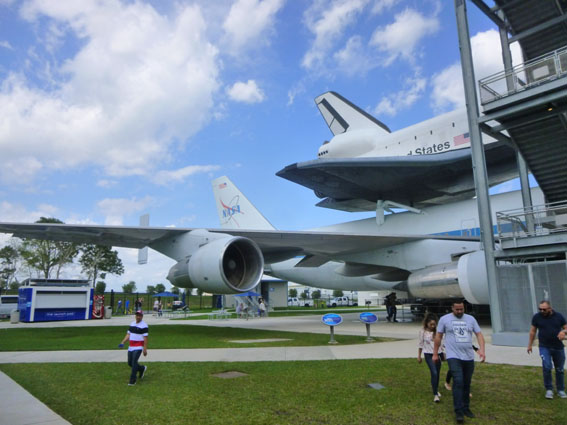
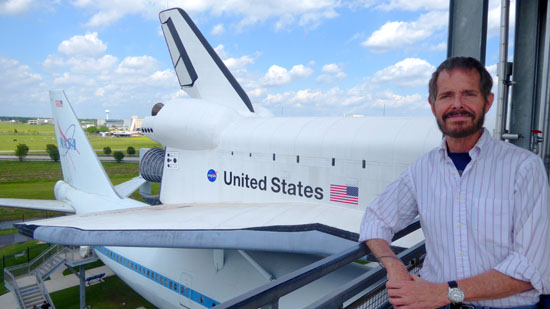
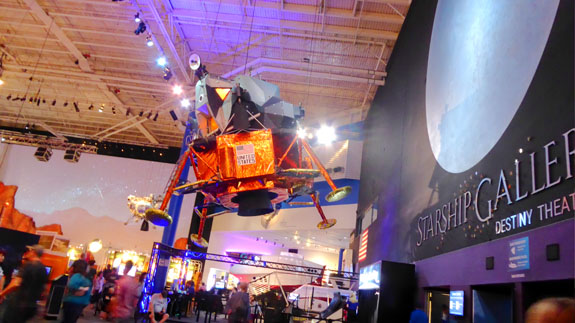
Independence Plaza
|
|
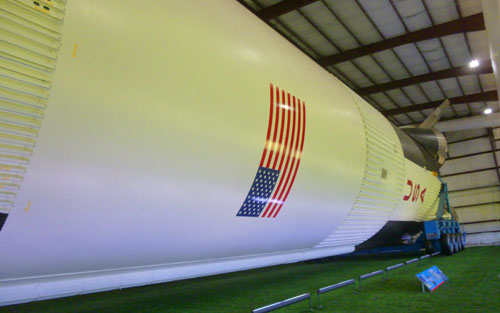
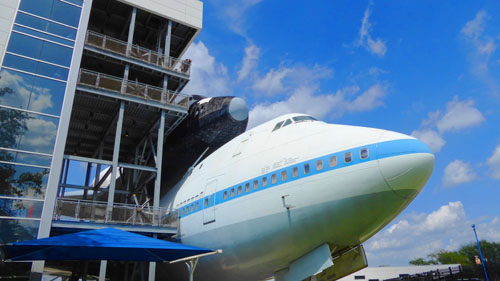
As you may be aware, the Space Shuttle landed most often back at the Kennedy Space Center; about 80 of the approximaely 140 missions landed there. Due to runway conditions, weather, and/or other factors, Edwards Air Force Base in California was used instead (and one mission landed at White Sands in New Mexico). routinely landed at Edwards Air Force Base in California. When the shuttle landed elsewhere, it had to be brought back to Kennedy Space Center for its relaunch, and so the problem was- how to get it there? The only feasible solution, since it could not take off and land on its own, was to carry it on a larger craft, and so a specially-modified Boeing 747 was ordered by NASA and was used for the purpose. It is that specific 747 that is now parked here in Independence Plaza.
|
|
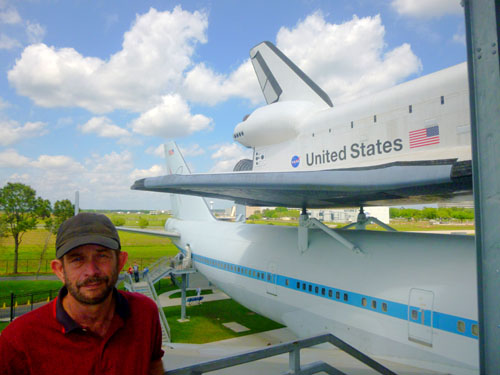
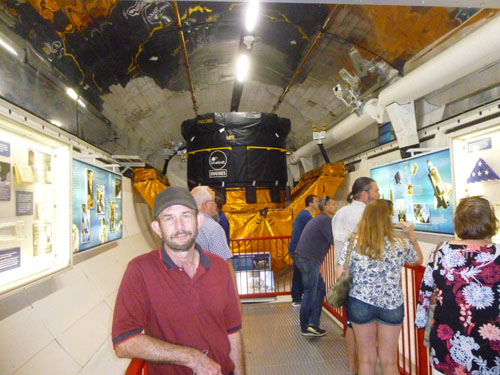
There were three access levels from the tower. The lowest gave access to the 747, and the top two gave access to the space shuttle- one to the shuttle equipment bay and one, at the top, to the flight deck. We climbed to the lower of these two entrances to visit the equipment bay firsst. Just as we were entering the shuttle itself, I took a picture looking back along the shuttle's exterior. The Space Shuttle replica Independence, formerly known as Explorer, was previously located at Kennedy Space Center Visitor Complex but was moved to make way for a new permanent attraction hall for Space Shuttle Atlantis. Independence is now displayed atop the retired Shuttle Carrier Aircraft, NASA 905.
|
|
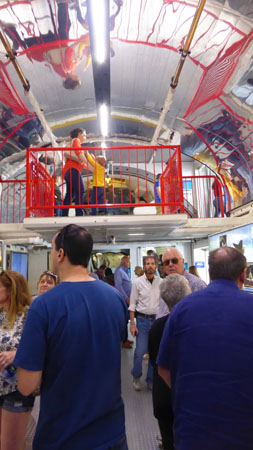
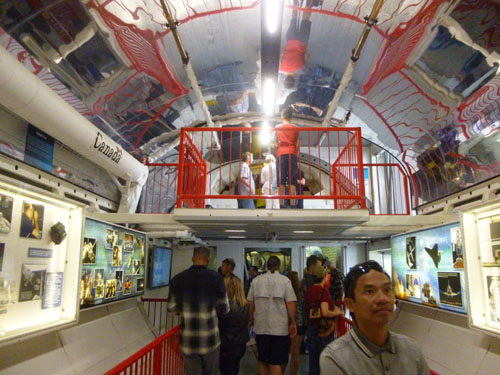
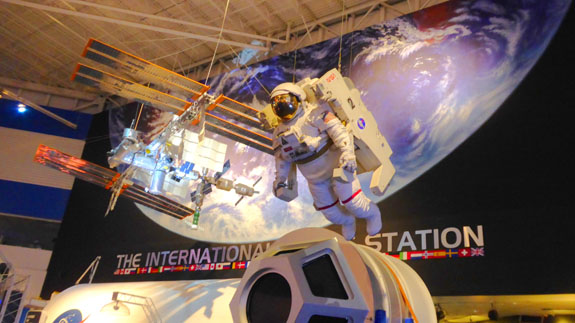
In the pictures we took in the shuttle bay, you can see a replica of the familiar "Canada shuttle arm" that was used in space to lever equipment from the shuttle bay out into space so it could be launched or transferred to the ISS.
But in all these pictures, keep in mind that the extension of the flight deck out into the equipment bay, as well as the walkways and railings at both levels, are, of course, just for the use of (and safety of) the tourists who come through the replica; they were not, of course, part of the actual space shuttle. (Neither was much of the lighting and stuff that you see in the pictures. The equipment bay was, essentially, a cavernous open space like the inside of an eighteen-wheeler trailer. In most cases, this space went into space full and came back empty.)
|
|
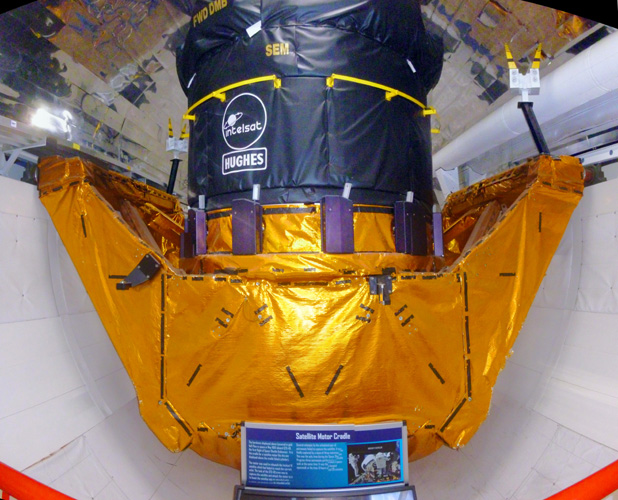
And at right is a picture with Fred where I am looking to the rear of the equipment bay at the replica satellite. Again, remember that the catwalk and railings weren't part of the actual shuttle, and of course neither were the informative displays along the outer walls of the equipment bay. It must have been incredible up in space where your eye is telling you that the equipment bay has a top and bottom, but your sense of balance is telling you there's no real "up" or "down"- particularly when you might be looking at the earth "above" you through the open bay doors!
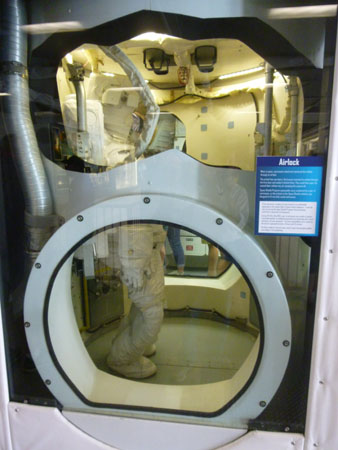
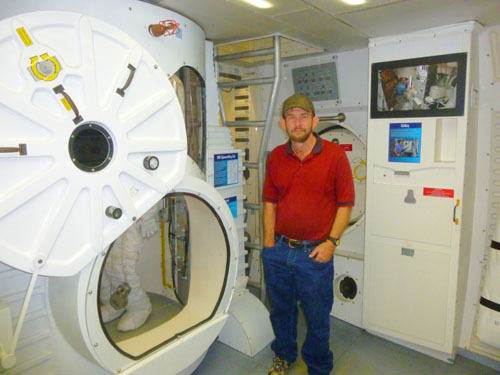
Before we go up to the flight deck, I'd like to describe the layout of the space shuttle interior a bit more. The equipment bay was usually not pressurized (filled with air), although it may well be that it could have been. Most of the time, it would be open to the vacuum of space. So, the shuttle astronauts would have to work in the bay in pressurized suits.
|
(There was an astronaut mannequin in a pressure suit inside the airlock, which shows that even though the "door" into the equipment bay was small, an astronaut could stand upright in the airlock itself. Once pressure had been equalized, the astronaut could "float" himself through that small aperture either into the equipment bay or back into the nose section.)
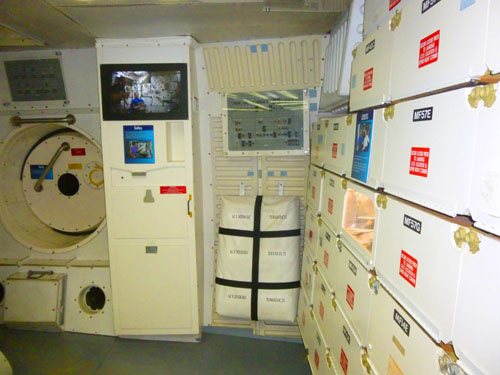
Here in the replica shuttle, the airlock was just to demonstrate how astronauts moved from crew quarters to the equipment bay; we tourists simply walked through what was a solid wall in the actual shuttle so that we could get around to the lower level of the crew section of the shuttle.
The two pictures below were taken from the pressurized side of the wall that existed in the actual shuttle.
|
|
We visitors could not go up the access ladder to the flight deck. To get there, we had to go back outside to the access tower and go up one more flight of stairs to the top level, where there was another door (again just for the benefit of tourists) to get in to the flight deck level of the shuttle.
|
Independence was brought to the JSC when the Kennedy Space Center received the retired space shuttle Atlantis in 2011. Independence (then named Explorer) wasn't brought to Houston right away, but rather six months later, when it began its move by barge to the JSC (and when its former name was removed). Upon arriving in the Houston area, the shuttle was taken to the JSC dock on Clear Lake, and early one morning was moved by a 144-wheel trailer down NASA Parkway to the Visitor Center (necessitating the removal of some light poles). JSC hosted "Shuttlebration" when the then unnamed shuttle arrived.
In 2013, Space Center Houston acquired NASA 905, one of NASA's two modified Boeing 747 Shuttle Carrier Aircraft. The center planned to display the replica shuttle atop the SCA with interiors of both vehicles accessible to visitors. A competition to name the shuttle was held; that's how it acquired the name Independence. The shuttle underwent extensive renovation in 2013 and 2014 to repair damaged components and update its appearance to more closely match that of the modern shuttle fleet. Modifications included a re-skinning of the exterior, replica thermal tiles, public access doors to the flight deck and payload bay, a glass cockpit on the flight deck, and display cases with shuttle program artifacts.
Finally, on August 14, 2014, a heavy lift was completed to place Independence on top of NASA 905, which had been moved to Space Center Houston from Ellington Field on April 30, 2014. The combined exhibit, named "Independence Plaza", opened to the public on January 23, 2016, at an estimated cost of $12 million.
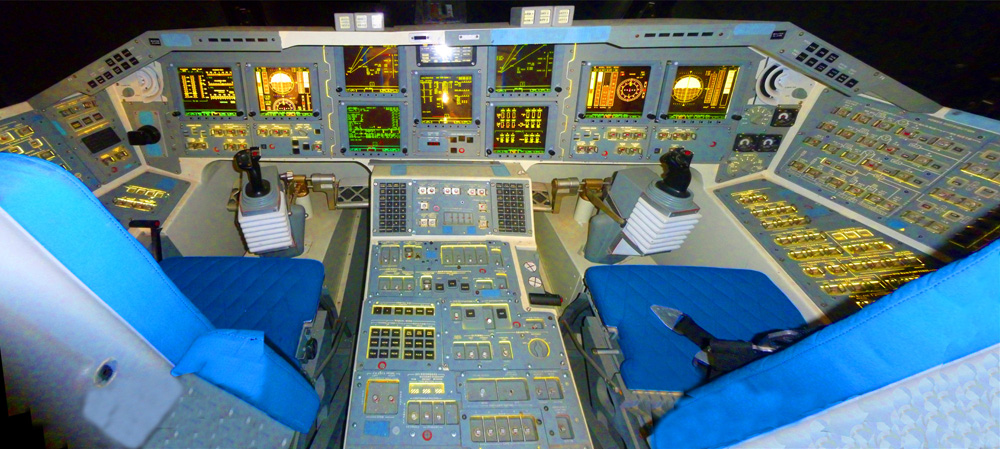
Here are two pictures taken from the level of the flight deck:
|
|
The main attraction on this level was the flight deck itself. I've seen pictures of actual shuttle crews on the flight deck, and I know there were three command stations. But it appeared that the third one had been removed to allow better access so that visitors could see the pilot and co-pilot chairs and the array of displays in front of them.
|
(Incidentally, to take this picture in such close quarters required me to take three separate pictures and stitch them together, but I think the result certainly shows the complexity of the shuttle controls quite well. I used the flash for these pictures.)
The cockpit was actually fairly dark so that the controls could be lit up to provide an even more realistic view of what sitting in one of the cockpit chairs would be like in space or on re-entry. To show you that aspect, I made a short movie, and you can use the player below to watch it:
|
(Mouseover Image Above for Video Controls) |
I thought that Space Center Houston had done a very good job of making the Space Shuttle come alive for those of us who will never have the opportunity to actually fly in it- which means everyone except for the 355 unique individuals that have actually flown on one or more Space Shuttle missions. The shuttle Independence is very realistic, and actually having it sit atop a 747 carrier aircraft made it even more so.
from the Access Tower Top Platform |
|
Back down on the ground, you are able to walk around under the 747, not something you'd normally be able to do at an airport. The plane is huge, and seems even larger when seen from underneath. Here are some pictures that we took while walking around underneath the aircraft:
|
Independence Plaza was a neat concept, and going through both aircraft was very interesting. After we were done, we walked back inside Space Center Houston to have a look around.
Exhibits in Space Center Houston
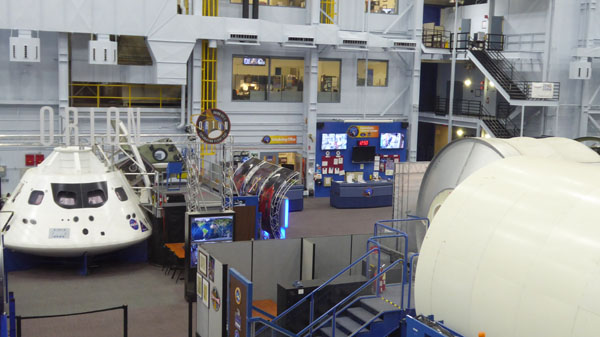
Space Center Houston is a science and space learning center, the official visitor center of NASA Johnson Space Center in Houston, and a Smithsonian Affiliate museum. The center opened in 1992 and hosts more than 1 million visitors annually in its 250,000-square-foot educational complex. The center holds over 400 space artifacts, permanent and traveling exhibits, attractions, live shows and theaters dedicated to preserving the history of America's human spaceflight program. It has a number of significant artifact galleries.
|
|
Inside Space Center Houston it was like a big arcade, what with all the various exhibits and display spaces scattered around the cavernous room. There was an auditorium, a large open lecture space, a cafe, and lots and lots of stuff for kids to interact with.
|
|
In the time remaining after our visit out to Independence Plaza, we just had a small window to wander around inside the Space Center, but it looked like the kind of place where you could spend a fair amount of time.
|
|
(Mouseover Image Above for Video Controls) |
Right at the appointed time, we went back outside to reunite with Karl, Nancy, and Ron, and the five of us drove back to the Hotel ZaZa.
You can use the links below to continue to another album page.
|
The Van Gogh Exhibit at the MFA |
|
The Houston Museum of Fine Arts |
|
Return to the Index Page for our Trip to Houston |